4-4: Task Orchestration
A central aspect of Gradle's task mechanism is the coordination of numerous tasks. When building Android Apps, especially while creating Plugins in collaboration with the Android Gradle Plugin (AGP), it's crucial to understand how to locate a task's implementation, insert custom tasks, modify the sequence of task graph nodes, and leverage multicore capabilities to enhance runtime performance.
The source code for this section can be found in the slack project:
- The plugin project resides at slack/plugins/slack-task-orchestra.
- Tinker with the plugin configuration at slack/plugin-config/src/main/kotlin/slack-task-orchestra-config.gradle.kts.
- The Android Application test project, a bearer of the plugin, resides in slack/app. Remember to activate the appropriate plugin in app.gradle.kts during testing.
4-4-1: Locate Implementation Classes by Task Name
To seamlessly insert a custom Task among a series of Tasks, we often need to identify their implementation classes behind, familiarizing ourselves with their inputs, outputs, and dependencies. Gradle provides a handy command to query the implementation class based on the Task name:
./gradlew help --task <taskName>For example, to find out about processDebugManifest:
$ ./gradlew help --task processDebugManifest

> Task :help
Detailed task information for processDebugManifest
Path
   :app:processDebugManifest
Type
   ProcessMultiApkApplicationManifest (com.android.build.gradle.tasks.\
     ProcessMultiApkApplicationManifest)
Description
   -
Group
   -
From the terminal output, we learn its exact implementation is com.android.build.gradle.tasks.ProcessMultiApkApplicationManifest, which allows us to further delve into AGP for the corresponding source code. At times, however, we might discover that the queried Task is an anonymous Task implementation, like when querying assembleDebug:
$ ./gradlew help --task assembleDebug

> Task :help
Detailed task information for assembleDebug
Path
   :app:assembleDebug
Type
   Task (org.gradle.api.Task)
Description
   Assembles main output for variant debug
Group
   -
Such anonymous Task implementations might be lifecycle nodes (with no Task Action) or simple Tasks without extending the Task class (usually happening in Gradle scripts using DSL).
val hello by tasks.registering {
  doLast {
    println("hello")
  }
}
Merely relying on the Type is insufficient for identification and localization. We once explored if there was any connection between Task and plugin as a workaround to find out the belonging plugin of a Task. Unfortunately, this is unsupported so far. Of course, it is good practice for plugin developers to fill up the description and group fields for Tasks.
For more detailed Task information, consider the following:
Dependencies tab in the
--scanreport. For an analysis of the--scanfeature, refer to Section 8-1.Apply third-party plugins, such as gradle-taskinfo (https://gitlab.com/barfuin/gradle-taskinfo), which offers additional insights like the dependency tree, the presence of a finalizer, etc.
Kotlin{ "name" : "assembleDebug", "path" : ":app:assembleDebug", "finalizer" : false, "group" : null, "type" : "org.gradle.api.Task", "queuePosition" : 41, "dependencies" : [ { "name" : "compileDebugSources", "path" : ":app:compileDebugSources", "finalizer" : false, "group" : "build", "type" : "org.gradle.api.Task", "queuePosition" : 19, "dependencies" : [...] }, ...] }
4-4-2: Orchestration of The Logic in a Single Task
In fact, a Gradle Task isn't the smallest executable unit. It acts more like a resource management unit, orchestrating both internal and external workloads. Furthermore, Task Action and Work Action can be leveraged within a Task.
Task Action
Earlier, we witnessed the extensive use of the @TaskAction annotation. It designates a Task's default Action. When it's the Task's turn to execute, methods annotated with @TaskAction will be invoked. But what if there's more than one?
@TaskAction
fun notifyBuildCompletion() { ... }

@TaskAction
fun notifyBuildCompletion2() { ... }
When multiple methods are tagged with this annotation, the execution order becomes unpredictable. This is because the addition order of @TaskAction is ultimately determined by the sequence returned by Class.getDeclaredMethods(). You can refer to DefaultTaskClassInfoStore#createTaskClassInfo(Class<? extends Task> type) for the specifics. The getDeclaredMethods() doesn't guarantee any order, as noted in OpenJDK's documentation and implementation. Therefore, it's standard practice to use the @TaskAction annotation only once within a Task, designating it as the default Action. The Gradle team has expressed that this is an irrational design, but a resolution is still pending.
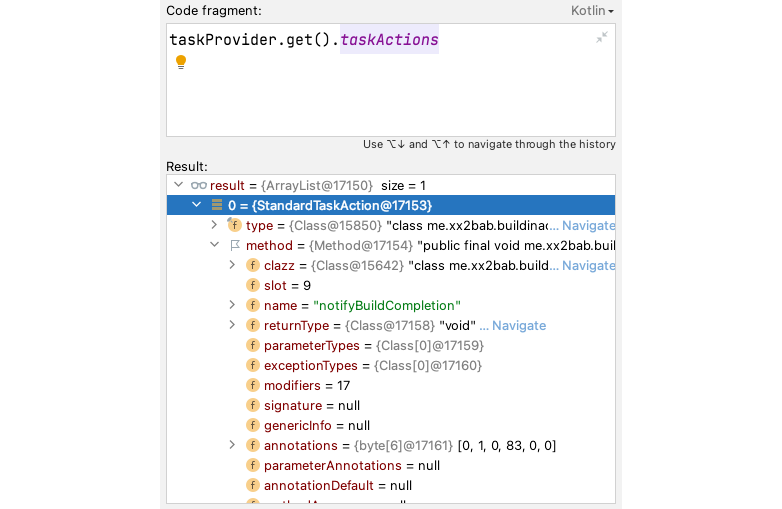
Methods marked with @TaskAction get wrapped into StandardTaskAction and are added to an ArrayList (Figure 4.4.1). The same can also be achieved using the doFirst(...) and doLast(...) methods, both of which accept org.gradle.api.Action as the carrier for specific logic. The distinction lies in their usage: @TaskAction is typically used for custom-type Tasks within subclasses inheriting from Task, while the latter are generally utilized in all scenarios.
// Creating a simple task within a script
val hello by tasks.registering {
  doLast {
    println("hello")
  }
}
// Extending an existing task with simple logic
project.tasks.getByName("pre${VariantName}Build").doLast {
  buildInfoDir.mkdirs()
  File(buildInfoDir, buildInfoFileName).apply {
    createNewFile()
    writeText(...)
  }
}
For the execution order within the StandardTaskAction, the sequence can be organized as follows:
- Actions added via
doFirst(...)execute first, as the name suggests. If there are multipledoFirst(...)invocations, they execute in reverse order of their addition. - Task Actions annotated with
@TaskActionare executed after alldoFirst(...)Actions have been completed. - Task Actions added using
doLast(...)are executed after all methods marked with@TaskActionhave completed, executing sequentially based on their addition.
With this understanding, you can freely decompose Task Actions and arrange their execution order.
WorkerExecutor
In Section 4-3, we augmented our Slack notification Plugin with multi-channel notification capabilities using a single Task and a single Task Action. Specifically, we wrote a loop that sends messages to Slack synchronously on a single thread. As the number of channels grows, the overall wait time could increase significantly. Is it possible to expedite this process using a concurrent approach?
Starting with Gradle 3.5, we can use WorkerExecutor to address such issues. Most developers are familiar with the Executor concept from the JDK, often associated with thread pool management. The JDK provides various implementations like FixedThreadPool, CachedThreadPool, and ScheduledThreadPool. While WorkerExecutor might sound similar, it's a simplified tool for concurrent work management in the Gradle environment, offering a straightforward concurrent operation model via a few APIs. Let's quickly explore its core interface:
public interface WorkerExecutor {
  ...
  WorkQueue noIsolation(Action<? super WorkerSpec> action);
  WorkQueue classLoaderIsolation(
    Action<? super ClassLoaderWorkerSpec> action);
  WorkQueue processIsolation(
    Action<? super ProcessWorkerSpec> action);
  void await() throws WorkerExecutionException;
}

public interface WorkQueue {
  <T extends WorkParameters> void submit(
    Class<? extends WorkAction<T>> workActionClass,
    Action<? super T> parameterAction);

  void await() throws WorkerExecutionException;
}
Notably:
WorkQueue#submit(...)provides a standardized method for Task submission and configuration.WorkerExecutor#noIsolation(...),WorkerExecutor#classLoaderIsolation(...), andWorkerExecutor#processIsolationoffer three isolation modes for concurrent Tasks:- No isolation, where Tasks operate under the same ClassLoader and process (default mode).
- ClassLoader isolation, allows Tasks to run in different ClassLoaders but within the same process.
- Process isolation, enables Tasks to operate in separate processes.
WorkQueue#await()offers a method to block within the current Task Action. Use it with caution, as it may prevent other Tasks in the Project from executing in concurrent mode. The difference betweenWorkQueue#await()andWorkerExecutor#await()is that the former waits only for the works of the current queue to complete, while the latter waits for all queued works to finish.
To integrate WorkerExecutor, using the example of the Slack notifications Plugin, you'll need to:
Inject an instance of
WorkerExecutorinto your custom Task, as covered in the previous section:kotlinabstract class SlackNotificationTask @Inject constructor( private val workerExecutor: WorkerExecutor ) : DefaultTask() { ... }Extract the loop logic into a standalone
WorkAction, complemented byWorkParametersfor creation and serialization:kotlinprivate interface SlackNotificationWorkParam : WorkParameters { val token: Property<String> ... } private abstract class SlackNotificationWork : WorkAction<SlackNotificationWorkParam> { override fun execute() { val token = parameters.token.get() ... val (code, responseBody) = postOnSlack(token, ...) logToFile(...) } }Sequentially add
SlackNotificationWorkto theWorkQueue:kotlinval workQueue: WorkQueue = workerExecutor.noIsolation() channels!!.forEach { slackChannel -> ... workQueue.submit(SlackNotificationWork::class.java) { token.set(slackChannel.token) ... } } workQueue.await()
To compare the performance of WorkerExecutor versus single-threaded execution, let's add 10 Slack channels. To capture the execution time of a single Task, a simplified --profile will generate a local report (refer to Section 8-1). After averaging the results of three tests and rounding to the nearest 50 or 100, we concluded the result in Figure 4.4.2.
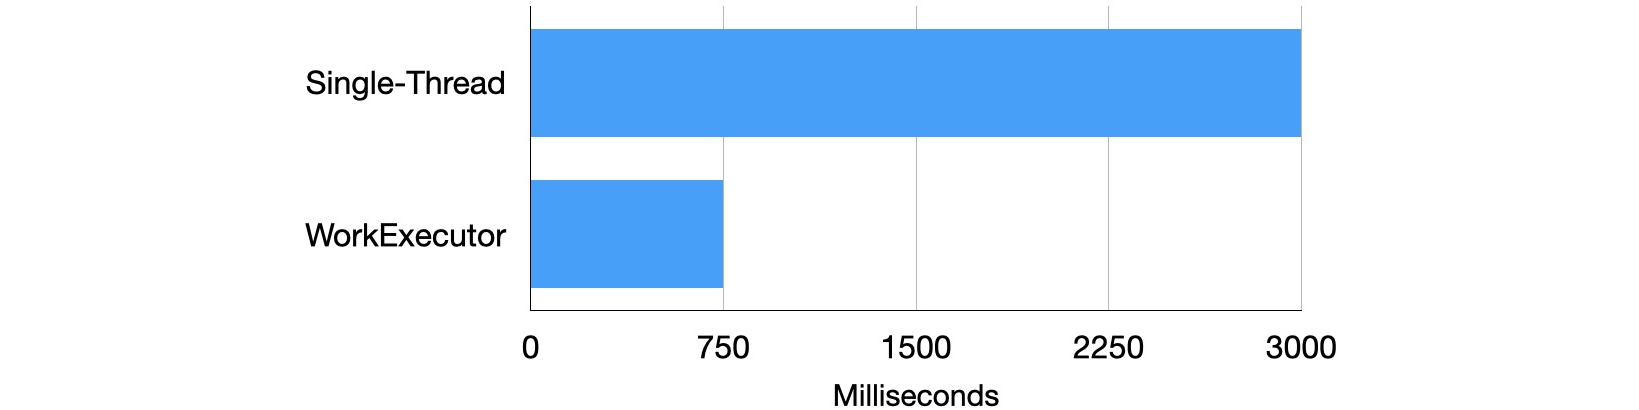
By default, utilizing WorkerExecutor reduces processing time from single-threading by 3/4. However, this example only demonstrates a simple network IO use case. In a complex building environment, results may vary depending on specific conditions.
4-4-3: Multi-Task Orchestration
Orchestrating multiple Tasks (dependency management) can be divided into "implicit handling" and "explicit handling" (or manual processes).
Implicit handling consists of two key elements:
- When a file object serves as the output for Task A and the input for Task B, Gradle will automatically order them to ensure Task A executes before Task B.
- Dependency relationships can be automatically propagated and sorted using the
Providerwithmap(...)orflatMap(...)API, as introduced in Section 4-2.
However, as we lean towards automation, it's important to recognize its limitations. Using the Android Gradle Plugin (AGP) as an example, the Provider object (Variant/Artifact API) was only declared stable starting with version 7.0. The current set of APIs only covers a small portion of developers' requirements. In this context, developing Plugins that interface with AGP and expecting complete automation for dependency management is still a challenge. Therefore, understanding the classic APIs and best practices for explicit handling is essential.
Inserting Preceding and Succeeding Tasks
A common scenario in explicit handling is the need to insert new Tasks either before or after a sequence of existing Tasks.
Let's assume the existing Task is TaskA. Its primary action simply logs a message at the lifecycle level, facilitating easy observation of its output. (For brevity, we will omit similar Task creation snippets in subsequent explanations.)
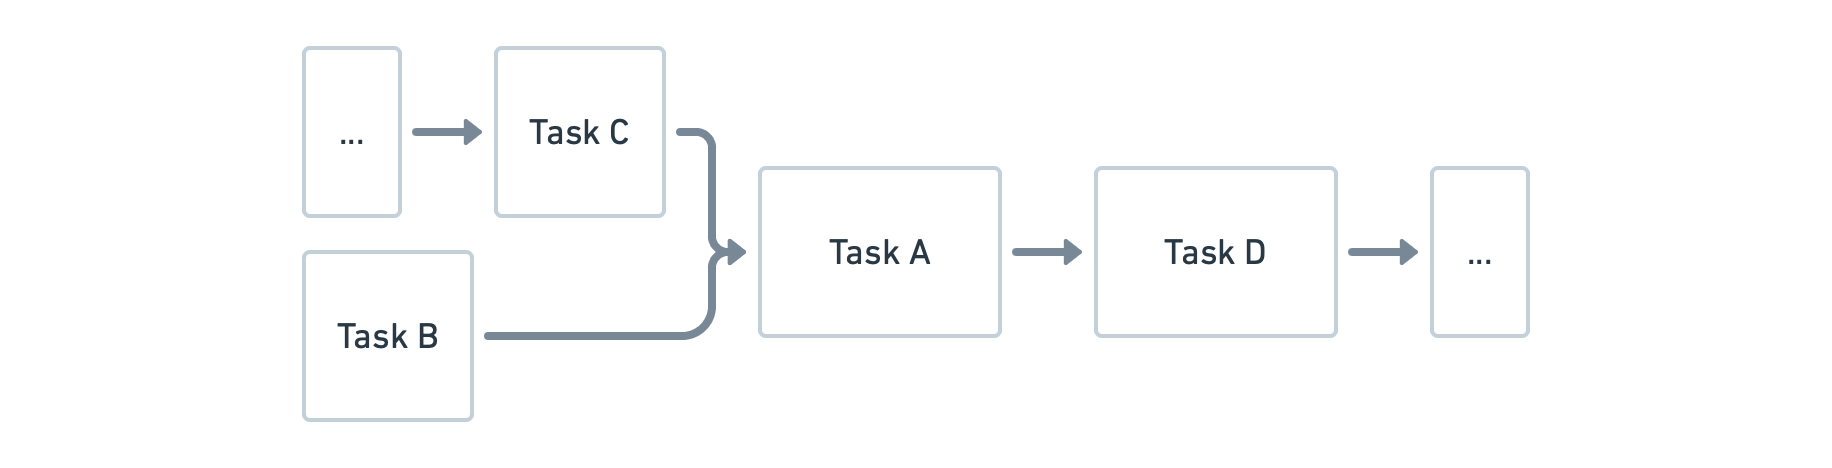
To insert a preceding Task, say TaskB, you can use the taskX.dependsOn(taskY) API, indicating that Task X depends on Task Y and will only execute after Task Y completes.
For a succeeding Task, like TaskD, you would also leverage the dependsOn(...) API, but in reverse: taskProviderD.dependsOn(taskProviderA). However, this alone will not ensure TaskD runs when executing assemble. It will only execute when explicitly triggered with the testTaskD command. If TaskD lacks further dependencies, simply linking it to a frequently used lifecycle node like assembleXxxx using assembleProvider.dependsOn(taskProviderD) ensures it's triggered during assembleXxxx execution.
For another common scenario, consider inserting TaskX between TaskY and TaskZ. The solution involves two preceding Tasks: x.dependsOn(y) and y.dependsOn(z).
abstract class TaskA : DefaultTask() {
  @TaskAction
  fun print() {
    logger.lifecycle("Task A is running.")
  }
}

// Registering TaskA based on Android Variant information
val taskProviderA = project.tasks.register(
  "testA$variantName",
  TaskA::class.java
)

// Inserting preceding task
taskProviderA.dependsOn(taskProviderB)

// Inserting succeeding task
taskProviderD.dependsOn(taskProviderA)
assembleProvider.dependsOn(taskProviderD)
For more advanced sequencing, if TaskA requires a preceding TaskC, and TaskC doesn’t have a direct dependency relationship with TaskB, but we wish TaskC to execute before TaskB, we can utilize the taskX.shouldRunAfter(taskY) or taskX.mustRunAfter(taskY) APIs to adjust Tasks that lack a direct dependency relationship. This flexibility enhances parallel execution capabilities and improves overall execution efficiency.
val taskProviderC = project.tasks.register(
  "testTaskOrchestraC$variantName",
  TaskC::class.java
) { // Configuration action
  this.mustRunAfter(taskProviderB)
}
...
taskProviderA.dependsOn(taskProviderC)
Both APIs are currently only member functions of Task, so for TaskProvider, use the configure(...) method or pass a configuration Action during Task creation. The differences between the two APIs are:
taskX.mustRunAfter(taskY): Strictly ensures Task Y runs before Task X. AddingtaskY.mustRunAfter(taskX)will result in a "Circular dependency between the following Tasks" error.taskY.shouldRunAfter(taskX): Offers a more relaxed rule and differs from the previous API in two aspects:- Circular dependencies caused by
shouldRunAfter(...)are ignored, and Tasks execute in their default order. - When parallel Task execution is enabled (refer to the "Parallel" subsection), if all the rules (like
dependsOn()or other auto-propagated dependencies) of a Task are satisfied, theshouldRunAfter(...)constraint is disregarded.
- Circular dependencies caused by
Creating a Task Action or Task?
In the context of multi-task orchestration, we recommend prioritizing the creation of Tasks (using dependsOn(...) for sequencing) over Task Actions because:
- It allows direct and explicit declaration of Task inputs and outputs, enhancing extensibility.
- Debugging is easier in the case of errors, as there's only one Task Action to locate by default.
However, for simple extensions (like copying an output file) that don't depend on other Tasks' inputs or outputs, or any in-place modification of the output for an existing Task, doFirst(...) and doLast(...) remain appropriate.
Inserting the First Task
How can we insert a custom Task to run just before all other tasks start executing? In rare cases, we might add a snippet of code in build script to execute in the Configuration phase, but using Tasks executed on-demand is the better choice for minimizing configuration time. Additionally, if your Task modifies anything inside the build directory, running commands like ./gradlew clean assembleDebug that includes clean will wipe out modifications made during the configuration phase. In this case, inserting a Task is the only viable solution.
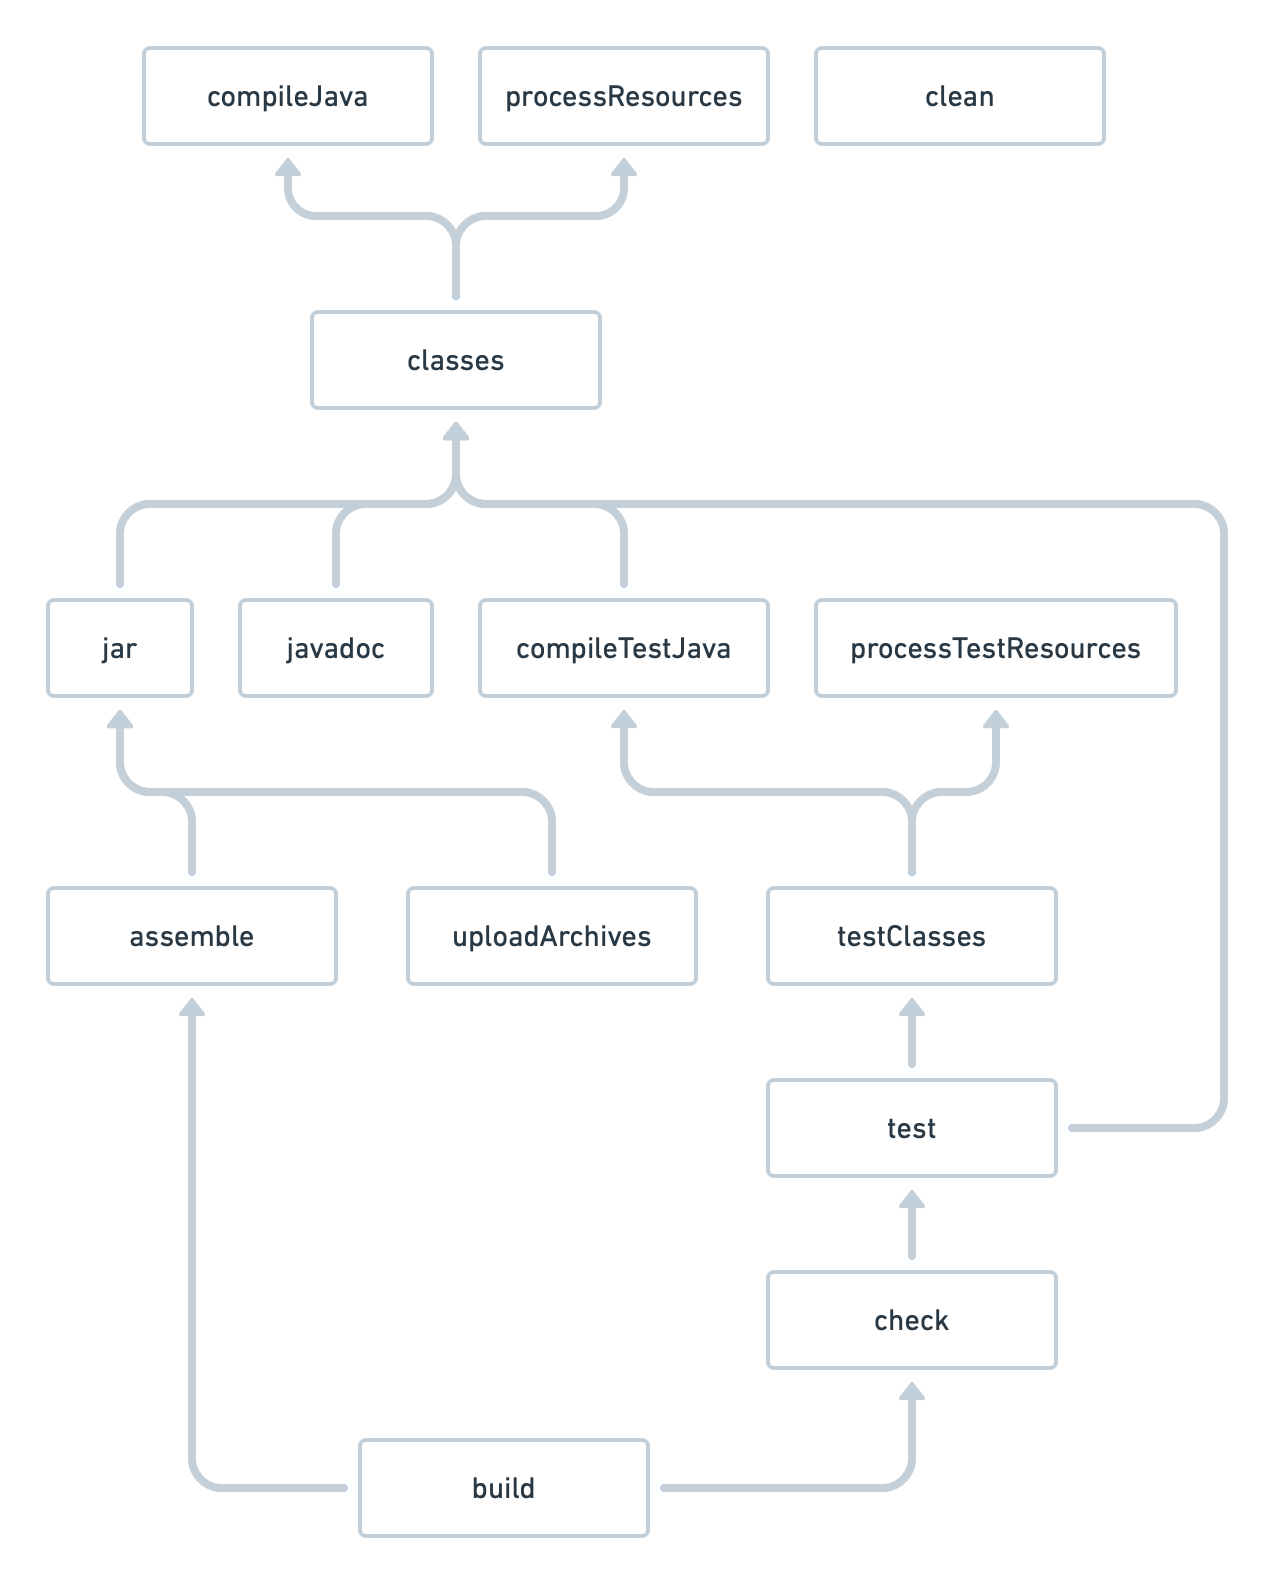
Given the trade-offs, let's solve this with the Rask approach. First, we need to understand the concept of Lifecycle Tasks: Tasks that lack a Task Action and serve merely as anchor points are known as Lifecycle Tasks. Gradle's base Plugins offer several lifecycle Tasks, with check, assemble, and build being common ones. Another instance, in the Java Gradle Plugin, these lifecycle Tasks each depend on several higher-level Tasks. (Figure 4.4.4)
In the Android Gradle Plugin (AGP), the Lifecycle Tasks like assemble at the diagram's end are similar, but AGP's complexity far surpasses the above structure. For Lifecycle Tasks, AGP further introduces Tasks like preBuild and preDebugBuild. preBuild is variant-agnostic, while Tasks like preDebugBuild or preReleaseBuild are variant-aware. AGP first runs preBuild, followed by variant-specific Tasks like preDebugBuild. Excluding initial Tasks like clean that aren't directly related to the build itself, the starting point or anchor for AGP Tasks is preBuild.
Thus, inserting a custom Task to precede the "first Task" means: preBuildProvider.dependsOn(taskProviderE). (Figure 4.4.5)

Inserting the Last Task
A common requirement after the build process is to introduce custom Tasks, such as renaming the output file or uploading it to a testing platform. On the Android platform, the typical packaging command we use is assemble${variantName}, which essentially represents the terminal Task in the Task Graph. By leveraging our knowledge of adding preceding and succeeding Tasks, it becomes straightforward to insert Tasks either before or after this main Task:
// Add a task before `assemble${variantName}`.
assembleProvider.dependsOn(taskProviderF)
taskProviderF.dependsOn(packageApplicationProvider)

// Add a task after `assemble${variantName}`.
taskProviderF.dependsOn(assembleProvider)
In practice, Android application projects can be complex. They might employ several Plugins targeting the final APK. Some Tasks may be inserted between packageApplication${variantName} and assemble${variantName}, while others might come after assemble${variantName}. Adjusting these Plugins and Tasks can influence the build command that the project eventually adopts, leading to potential modifications in CI/CD scripts, albeit minor ones.
For consistency across projects, I prefer adding a terminal Task labeled powerAssemble${variantName}. Just like assemble${variantName}, it represents a Lifecycle node. With this approach, our main consideration becomes the command sequence between assemble${variantName} and powerAssemble${variantName}, simplifying how Tasks are added or removed by linking Tasks seamlessly using the dependsOn() API. Even if third-party tasks rely on assemble${variantName}, they can be wrapped with powerAssemble${variantName}. (Figure 4.4.6)
val powerAssemble = project.tasks.register("powerAssemble$variantName")

taskProviderF.dependsOn(assembleProvider)
taskProviderG.dependsOn(taskProviderF)
powerAssemble.dependsOn(taskProviderG)
The approach of adding virtual head and tail nodes is common in chained data structures. Though Gradle Tasks are represented as a DAG, the prior principle remains the same. The design of Artifact caching system in AGP also adopts a similar method.
Finalizing with finalizedBy
Gradle provides a power API: taskX.finalizedBy(taskY), often mistaken as a tool to append succeeding Tasks. While it indeed ensures that taskY runs after taskX, why is it inappropriate for specifying Task sequence? Let's first understand its usage. Currently, finalizedBy(...) is a member method of Task. For TaskProvider, one needs to use the configure(...) method or pass a Configuration Action during Task creation:
assembleProvider.configure {
  finalizedBy(taskProviderFinalizer)
}
The API has two characteristics:
- If a Task has multiple finalizers, they are sorted by their names, actually making them unordered in this context.
- The finalizer always runs, irrespective of whether the associated Task succeeds.
The functionality of finalizedBy(...) closely mirrors Java's try...catch... syntax and is suitable for Tasks related to resource cleanup. For instance, if a Task produces a temporary file containing sensitive data, we can assign a finalizer to ensure the file is cleaned up, regardless of the Task's success or failure.
To reiterate our initial question: Why shouldn't finalizedBy(...) be used as a tool for appending Tasks? As an example, if we try to rename an APK using assembleProvider.finalizedBy(apkRenameProvider), we might face the following issues:
- Even if APK packaging fails, the renaming Task will still execute.
- It's challenging to determine the sequence among other succeeding Tasks.
For the correct approach, refer to the section above on "Inserting the Last Task."
Shared Build Services
When developing Android apps, sharing data between Activities is a common scenario. For instance:
- Passing serialized data between Activities using
Intent. - Creating a data repository (in the Model layer) and sharing it by dependency injection.
Drawing a parallel with Android, on the Gradle platform, Tasks often rely on File for data sharing. However, when the shared entity among Tasks is a foundational tool or service, the Shared Build Services feature is recommended. These services exist as singletons throughout the entire build lifecycle (once registered). They can, for example, connect to remote databases or messaging services. In AGP, examples of shared build services include Aapt2DaemonBuildService and LintClassLoaderBuildService.
These Shared Build Services are implemented through the org.gradle.api.services.BuildService class. It's a set of new APIs introduced starting with Gradle 6.0. Let's assume we have a proprietary Web service that stores static configurations needed across multiple project builds. Through the BuildService, we can share this infrastructure. The integration steps resemble those of WorkerExecutor. We first create a PrivateService to encapsulate our hypothetical Web client, DummyClient, and provide an external fetch(...) method. This service implements both the BuildService and AutoCloseable interfaces:
BuildServicehas a generic declarationParams, which represents the parameters required to construct the service, reminiscent of the approach seen withWorkAction.AutoCloseableindicates the service implements theclose()method, which we use to perform cleanup when the service instance is about to be destroyed in case of any memory leaks.
abstract class PrivateService
  : BuildService<PrivateService.Params>, AutoCloseable {

  internal interface Params : BuildServiceParameters {
    val username: Property<String>
    val password: Property<String>
  }

  private val client: DummyClient

  init {
    val username = parameters.username.get()
    val password = parameters.password.get()
    client = DummyClient()
    client.connect(username, password)
  }

  fun fetch(uri: URI) = client.fetch(uri)

  override fun close() = client.disconnect()
}
Within the Plugin's apply(...) method, we register this service and provide the necessary parameters.
val privateService = project.gradle
  .sharedServices
  .registerIfAbsent(
    "PrivateService",
    PrivateService::class.java
  ) {
    this.parameters.username.set("username")
    this.parameters.password.set("password")
  }
You may notice that the service is actually registered on the gradle object's sharedServices, making it a global service accessible and sharable by other Plugins. Once we have the Provider<PrivateService> for this service, we can inject it into the Tasks that need it. Note that there's no input-output dependency between such services and Tasks, so it's marked as @get:Internal.
val taskProviderF = project.tasks.register(
  "testTaskOrchestraF$variantName",
  TaskF::class.java
) {
  service.set(privateService)
}

...

abstract class TaskG : DefaultTask() {
  @get:Internal
  abstract val service: Property<PrivateService>

  @TaskAction
  fun print() {
    logger.lifecycle("Task G is running.")
    val channels = service.get()
      .fetch(URI.create("/config/notification_channels.csv"))
    logger.lifecycle("Task G fetched channels: $channels")
    // ...
  }
}
Running ./gradlew :app:powerAssembleDebug (which will trigger TaskG) we can see the following output:
> Task :app:testTaskOrchestraGDebug
Task G is running.
Task G fetched channels: dummy result of /config/notification_channels.csv
Parallelism: the parallel switch
The --parallel switch instructs Gradle to execute Tasks concurrently across multiple projects (generally referring to modules), such as :app and :library. This is often termed as "Parallel Project Execution". We will provide a detailed perspective on its scope and limitations from a development standpoint. Initially, this flag has the following constraints:
- It's applicable and effective only in multi-module scenarios.
- It's constrained by the
--max-workerswhich determines the maximum worker usage. - Projects being executed in parallel must be in a “decoupled” state (Decoupled Projects). Even though it's not a strict condition for the switch's enabling, projects that aren't decoupled won't participate in parallel execution.
What does "decoupled" mean? By definition, it implies that one Project doesn't directly access another's Project model. In practice, it entails operations related to a Project. For instance:
// 1. Project dependencies
implementation(project(":library"))

// 2. Task dependencies
taskXFromApp.dependsOn(":library:taskYFromLibrary")

// 3. project/app/build.gradle.kts
allprojects { ... }
While the first two examples maintain the "decoupled" state, the third one breaks it. It utilizes the allprojects(...) method within a subproject :app, triggering the "cross project configuration" feature, thereby intertwining the configuration scripts of both projects. Nonetheless, using this feature at the root directory of multi-module projects is permissible. The root's Project inherently has parent-child relationships with all sub Projects:
// project/build.gradle.kts
allprojects { ... }
subprojects { ... }
Diving into the internal mechanics, the decoupling relates to the Project Lock concept. As seen in the implementation of DefaultTaskExecutionGraph#executeWithServices(...), there's the passing of an ExecutionPlan parameter which internally maintains a Set<ResourceLock> projectLocks. When --parallel is enabled, the project uses its own path for the corresponding lock. Without parallelization, it uses the root project's path. We anticipate future versions to achieve "complete decoupling", ultimately removing the ProjectLock constraints.
When multi-module projects are correctly decoupled, it results in enhanced efficiency during Parallel Project Execution. In the long run, more performance improvements rely on this decoupled state:
- Configuration On Demand;
- Parallel Project Configuration;
- Reusing unchanged project configurations, detailed in sections 4-5 about Configuration Cache;
- Project-level “up-to-date” checks, analogous to Task-level checks, are also detailed in Sections 4-5;
- Replacing the
Projectrecompilation with locally precompiled artifacts.
Out of these, Configuration On Demand is an emerging feature, meaning "try to configure only those Projects related to the Tasks provided", thus reducing the Configuration Phase duration.
The relationships between these concepts can be visualized in the Figure 4.4.7 (upper-tier features depend on lower-tier ones).

However, even without --parallel, Tasks can still run concurrently in some certain condition, which is applicable even for single-module scenarios. A classic instance is parallel execution based on WorkerExecutor. Differentiating between these parallel executions:
--parallel: Module-level parallelism. Thread names during specific Task execution typically begin withExecution worker for ':'. This can be found inDefaultTaskExecutionGraph#executeWithServices(...)reflecting theExecutorServiceconstruction.WorkerExecutor: Work Action-level parallelism. Thread names usually start withWorkerExecutor Queue, visible inWorkerExecutionQueueFactory.
Both of them use ExecutorFactory for specific ExecutorService creation. In reality, during the build process, numerous ExecutorService instances are created, including those for "Daemon health stats", "Cache worker for xxx", etc. Most of these ExecutorService instances manage specialized-purpose threads, with the primary resource consumption attributed to the earlier mentioned ones.
Regardless of which ExecutorService, the internal thread pool always adheres to the --max-workers parameter. By default, this parameter is equal to the CPU core count. For CPUs supporting hyper-threading, it's twice the core count (as each core corresponds to two logical threads). As an example, let's use a split multi-module project P for a simple test, running on a 6-core 12-thread Intel i7 laptop with ample memory. (Figure 4.4.8)
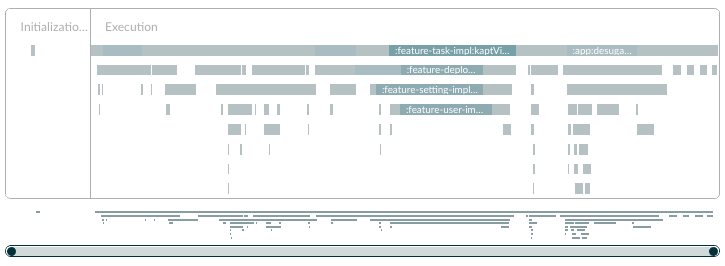
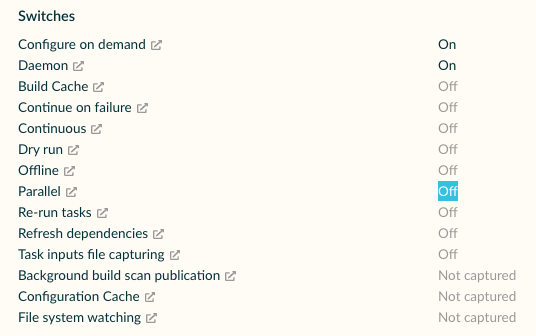
By examining the Build Scan Switch panel (Figure 4.4.9), although the project hasn't enabled the Parallel feature by default, the Timeline diagram reveals it supports 8 workers running concurrently. Time-consuming Tasks like kaptDebugKotlin and compileDebugKotlin have already been parallelized.
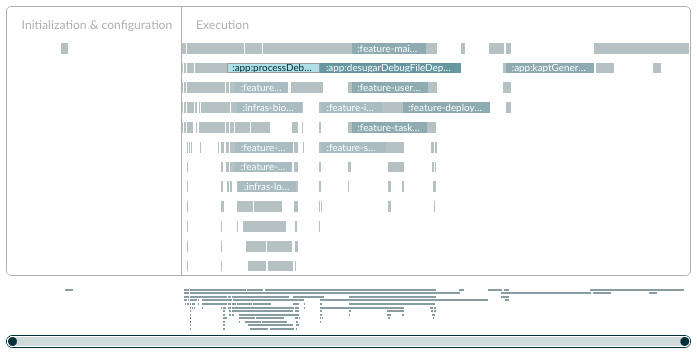
Without --parallel, multiple full compilation tests result in around two minutes each. However, enabling this flag allows for full-scale parallel compilation with 12 workers (equaling the maximum thread count, as seen in Figure 4.4.10). The added parallelism predominantly leans towards Tasks like mergeDebugResource. The average test result then drops to about one and a half minutes, speeding up by approximately 25%.
Given that the relevant code for the scan report isn't open-source and there's no official statement on this, as of this writing, we don't know if the parallel execution showing in the diagram without --parallel is caused by WorkerExecutor or not.
Lastly, when parallel execution results in compilation issues, how can one achieve entirely linear Task execution for debugging? Using the --max-workers=1 parameter confines the maximum worker count in the current Gradle environment, which is uniformly applicable to any form of parallelism. This leads to the illustrated linear execution graph. Below example has up to 30 modules (Figure 4.4.11), a comparison between --parallel and --max-workers=1 reveals a compilation time reduction of just under 50%.

The functionality of --parallel continues to evolve. If I were to summarize: it's a higher-dimension, more aggressive parallel strategy. However, we must temper our expectations. As of now, some projects with fewer modules might not witness significant performance improvements. We look forward to Gradle introducing more stable and efficient parallel-related features.
4-4-4: Summary
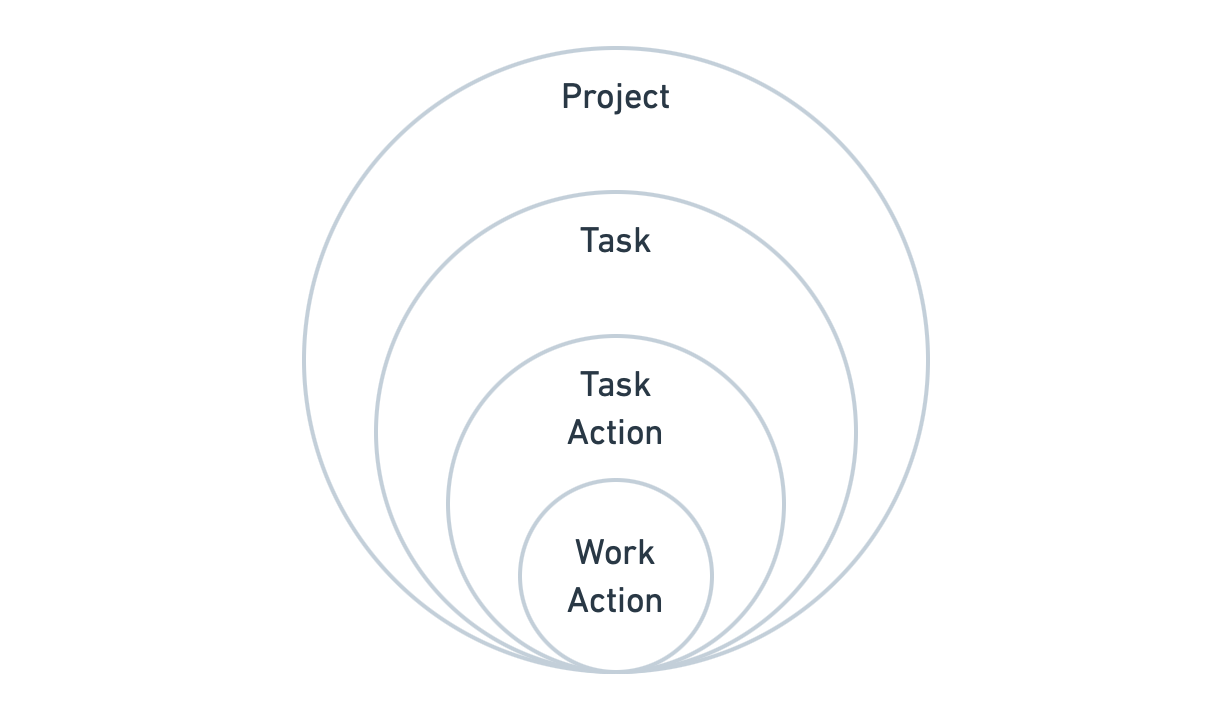
For single-Task orchestration, we've outlined the following logical levels in a diagram: Project -> Task -> Task Action -> Work Action, with granularity decreasing progressively. (Figure 4.4.12)
For multi-task scheduling, in addition to mastering task scheduling, we also need to pay attention to parallelism and performance, minimize unnecessary dependencies between tasks and modules, and use WorkerExecutor and --parallel to improve build performance.