2-4: Crafting Your First Plugin: Send Build Notifications to Slack
This section will serve as a quick overview, laying out the steps necessary to develop a comprehensive, multi-faceted plugin that ties into the Android build process.
The source code used in this section is located in the slack project, specifically:
- The plugin project resides in slack/plugins/slack.
- Tinker with the plugin configuration at slack/plugin-config/src/main/kotlin/slack-config.gradle.kts.
- The Android Application test project, a bearer of the Plugin, resides in slack/app. Remember to activate the appropriate Plugin in app.gradle.kts during testing.
plugins {
  id("com.android.application")
  kotlin("android")

  // Activate only one plugin each time.
  id("slack-config")
  // id("slack-lazy-config")
  // id("slack-nested-blocks-config")
  // id("slack-task-orchestra-config")
  // id("slack-cache-rules-compliance")
  // id("slack-test")
}
2-4-1: Requirement and Preparation
Project collaboration often involves an IM tool where a reminder bot is added to the group to share automated messages (Figure 2.4.1). These could relate to the outcomes of CI/CD execution, server outages, and more.

Our first Plugin involves a message notification API integrated with a Slack Bot. Upon completion of a project build, the bot sends a summary message to the designated Slack Channel. For details on Slack's open API and Bot settings, you may refer to its document (https://api.slack.com/bot-users). This section will skip preparation steps for channel creation, bot addition, obtaining a Token and Channel ID.
The typical components of a Gradle Plugin are:
- Plugin: The plugin's entry point, corresponding to the Plugin class loaded by
plugins { id("...") }orapply<P>(). One or more instances of these may exist in one Project. - Extension: This defines the Plugin's DSL configuration, similar to the familiar
android{...}orjacoco{...}. Its presence and number are dependent on whether the Plugin has any open configurations. - Task: This is the usual unit of actual logic execution within the Plugin. It may be absent or numerous, depending on specific logic requirements.
Please note that we haven't applied the Lazy Properties mechanism (Section 4-2) and new Android Variant API v2 (Section 3-3) to samples of this section. This unique action aims to help developers who have no experience with custom Gradle Plugins gain a better understanding of the key points of Gradle Plugin development. We'll continue to refine and improve this example in subsequent chapters.
2-4-2: Plugin Initialization
Turning our attention to the code, our first step is to create a Plugin class that extends Plugin<Project>, signifying that this is a Gradle Plugin with Project as its target context. It can only be worked on with the Gradle Project, which usually represents a module with build.gradle(.kts) script. Settings is another possible target to associate the Plugin with a Gradle workspace, and it is applied in settings.gradle(.kts) typically.
abstract class SlackNotificationPlugin : Plugin<Project> {

  private val androidAppPluginApplied = AtomicBoolean(false)

  override fun apply(project: Project) {
    val slackExtension = project.extensions.create( // [I]
      "slackNotification",
      SlackNotificationExtension::class.java
    )

    project.afterEvaluate {
      check(androidAppPluginApplied.get()) {
        "...(exception explanation)"
      }
    }

    project.plugins.withType<AppPlugin> {
      androidAppPluginApplied.set(true)

      // Main logic starts from here.
      val androidExtension = project.extensions
        .findByType(AppExtension::class.java)!! // [II]
      androidExtension.applicationVariants.configureEach {
        if (slackExtension.channelId.isBlank()
          || slackExtension.token.isBlank()
        ) {
          throw IllegalArgumentException(
            "..."
          )
        }
        if (slackExtension.enabled) {
          ...
          val taskProvider = project.tasks.register( // [III]
            "assembleAndNotify${this.name.capitalize()}",
            SlackNotificationTask::class.java
          ) {...}
          ...
        }
      }
    }
}
The above code is executed during the Gradle Configuration phase. At this stage, we should strive for simplicity, deferring complexities until the task execution phase.
Plugin Extensions and Verification
Within the callback function apply(project: Project), we draft the Plugin's configuration logic. For Plugins collaborating based on AGP, two preparatory steps are usually encompassed:
- Creating an Extension: This allows us to configure the Plugin in the build.gradle (.kts) script via the Gradle Extension feature. In this instance, we've used
slackNotificationas the root configuration name, which will be referenced later in slack-config.gradle.kts. As you can observe from code snippet [I],project.extensions.create(...)links theSlackNotificationExtensiondata structure to a named DSL configuration,slackNotification. The user who applied this Plugin can subsquently configure theSlackNotificationExtensioninstance viaslackNotification{...}syntax in a build.gradle(.kts). A registered Extension can be queried viaproject.extensions.findByType(...)(and many other APIs), as shown in code snippet [II]. - Verifying that the applied
Projectmeets our requirements: For instance, we expect it to be an Android Application module loaded with thecom.android.applicationPlugin (rather than other types such as Library or Dynamic Feature). This check prevents the Plugin from being applied to the wrongProject.
Regarding the second check, our approach might differ from that of common Plugins. Normally, project.hasPlugin(...) could be used to verify if the Project has loaded the required Plugin. However, due to the modularization requirements of the slack project, we place the slack Plugin configuration separately in slack-config.gradle.kts. As an independent script, due to Gradle Kotlin DSL constraints, project.hasPlugin(...) would fail to find the com.android.application Plugin within Gradle Sync triggered by the IDE, consequently throwing an error and affecting the generation of safe-accessors. To tackle this issue, we employ a "delayed detection" strategy as follows:
- An
AtomicBoolean(false)objectandroidAppPluginAppliedis defined as a flag. - The
withType<Plugin> {}from thekotlin-dslPlugin is used for safe operations (see slack/plugins/slack/build.gradle.kts), not executing if the required Plugin type is empty. We set the flag totrueonly whenwithType<Plugin>{}is executed. - We do not check the flag in the main process of
apply(project: Project), but delay it toproject.afterEvaluate(...), as Gradle Sync doesn't triggerproject.afterEvaluate{}. Therefore, we can guarantee the Type-Safe model Accessors generation and safe detection of theProjectcontext later on.
For Android Library modules, we should switch to com.android.build.gradle.LibraryPlugin, and if we merely want to ascertain whether the host script has applied any Android Plugins, we should check com.android.build.gradle.api.AndroidBasePlugin.
Variant Traversal
Following the identification and retrieval of the AppExtension in the current project, the configureEach(...) method is invoked on the applicationVariants to cycle through and tailor each app variant. Further discussion on Variant concept can be found in section 3-1.
This instance serves as the second point of divergence for the generic Plugin, wherein the configureEach(...) method is suggested over the all(...) method for Variant API v1. It's mainly because of the ability of the configureEach(...) API to avoid unnecessary configuration by deferring until Task execution is ascertained, when traversing specific Tasks with withType<T>(). Meanwhile, in certain version Android Studio or IDEA may have explicit contradictions between Gradle's DomainObjectCollection#all(...) and all(...) extensions in the kotlin.collections package.
// org.gradle.api.DomainObjectCollection.java
void configureEach(Action<? super T> action);
void all(Action<? super T> action);

// kotlin.collections._Collections.kt
public inline fun <T> Iterable<T>.all(predicate: (T) -> Boolean): Boolean
Variant traversal, a common practice while creating Plugins when working with Android Gradle Plugin, is typically used to address two types of issues:
- Task registration according to variants, such as
assembleDebugandtestPaidRelease. Similarly, the notification Tasks, due to their reliance on the output of particular variants, also necessitate registration according to variants. Hence, the variant name is appended as the Task's suffix, as seen in code snippet [III]project.tasks.register("assembleAndNotify${this.name.capitalize()}". - For Plugin features that depend on extensions, we utilize a callback mechanism to delay the creation of these dependencies, ensuring that registered extensions are initialized and their value has been set. Examples include callbacks of
project.afterEvaluate(...)orvariants.all(...), where extension configurations are safely read to register Tasks.
With the classic AppExtension and ApplicationVariant aka Variant API v1 in use above, it is noteworthy that Android Variant and Extension were split into two sets post AGP 4.1.x:
- Classic (v1), currently featured in the com.android.tools.build:gradle library.
AppExtensionLibExtensioncom.android.build.gradle.api.ApplicationVariantcom.android.build.gradle.api.LibraryVariant
- New (v2), currently housed in the com.android.tools.build:gradle-api library.
ApplicationExtensionLibraryExtensionCommonExtensionApplicationAndroidComponentsExtensioncom.android.build.api.variant.ApplicationVariantcom.android.build.api.variant.LibraryVariant
The primary motive behind this is the AGP team's preference for developers depending on AGP to use a set of publicly exposed APIs without concern for changes in internal implementations. For a detailed comparison and contrast of multiple Android Extension and Variant APIs, please refer to Chapter 3.
2-4-3: Constructing an Extension
// SlackNotificationExtension.kt
abstract class SlackNotificationExtension {
  var enabled = true
  var token = ""
  var channelId = ""
  var message = ""
}

// slack-config.gradle.kts
slackNotification {
  token = ...
  channelId = ...
  message = "... built successfully!"
}
As seen in the preceding code, the SlackNotificationExtension class is used as the entry point of Plugin configuration. Contrarily, Gradle's Extension does not denote a class or interface named Extension to be inherited or implemented. Most Java, Groovy, and Kotlin classes that provide member variables or closure methods can be registered as an Extension configuration via the project.extensions.create(...) API.
The SlackNotificationExtension merely incorporates basic data type parameters with configuration as shown above. Post-registration, the script importing the Plugin can access it using DSL. For advanced usage of Extension on Provider lazy type, closure configuration, nested configuration, or other complex DSL, please refer to Sections 4-2 and 4-3.
The Extension concept is not confined to the interplay between plugins and the Gradle script DSL, but is inclusive of similar APIs such as Project Extension and Settings Extension (which return an ExtensionAware instance) to have a shared area in the script scope.
// Get the current Project level extension in Groovy DSL
project.ext[...]
// Get the current Project level extension in Kotlin DSL
project.extra[...]

// Get the current Settings level extension in Kotlin DSL
settings.extra[...]
2-4-4: Constructing a Task
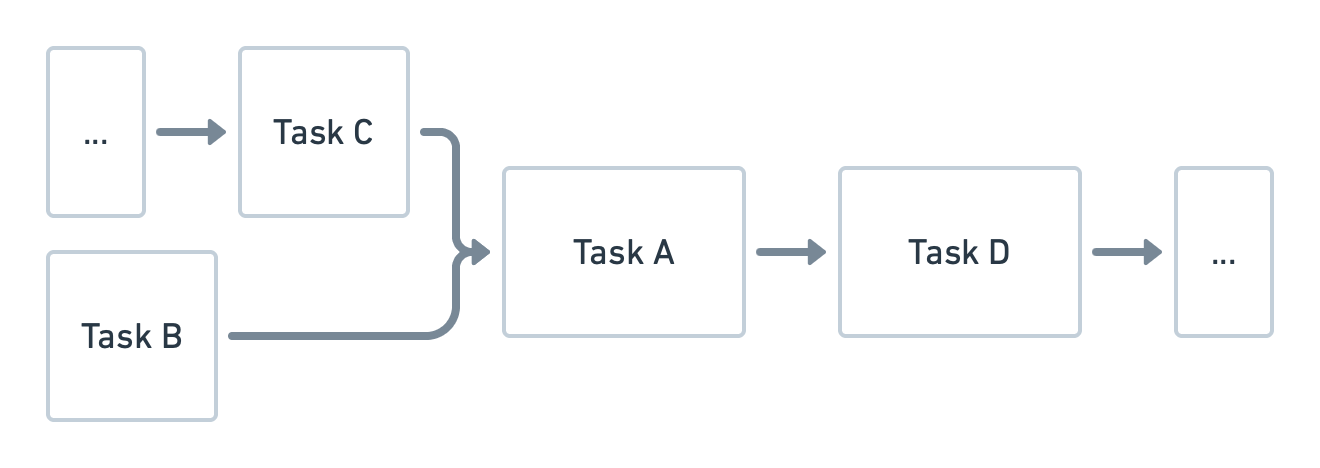
In the Gradle world, Tasks are fundamental units that are easily observable. When executing any build command (e.g., ./gradlew assembleDebug), the command actually maps to a Task. This Task might depend on multiple pre-Tasks, forming a forward-connected Task graph (Figure 2.4.2) or, in a specific term, the Directed Acyclic Graph (DAG). We will summarize its primary functions here and proceed to Section 2-6 for more details.
Tasks, as units of execution, constitute the most essential element in writing Plugins. Our first step is to extend DefaultTask to create the SlackNotificationTask.
abstract class SlackNotificationTask : DefaultTask() {

  @get:Input // [I]
  var token: String = ""

  @get:Input
  var channelId: String = ""

  @get:Input
  var message: String = ""

  @get:OutputFile // [II]
  var notifyPayloadLog: File? = null

  @TaskAction // [III]
  fun notifyBuildCompletion() {
    val customMsg = StringBuilder().append("Message: ${message}\n")
      .append("Result: OK\n")
      .toString()
    val (code, responseBody) = postOnSlack(token,
      channelId, customMsg)
    logToFile(
      channelId,
      customMsg,
      responseBody,
      code
    )
  }

  private fun postOnSlack(
    token: String,
    channel: String,
    text: String
  ): Pair<Int, String> {
    val jsonWithUtf8 = "application/json; charset=utf-8".toMediaType()
    val requestBody = ("{\"channel\": \"$channel\", "
        + "\"text\": \"$text\"}")
    val request: Request = Request.Builder()
      .url("https://slack.com/api/chat.postMessage")
      .header("Authorization", "Bearer $token")
      .post(requestBody.toRequestBody(jsonWithUtf8))
      .build()
    var code: Int
    var responseBody: String
    try {
      OkHttpClient().newCall(request)
        .execute()
        .use { response ->
          code = response.code
          responseBody = response.body?.string() ?: ""
        }
    } catch (e: IOException) {
      code = -1
      responseBody = ""
    }
    return Pair(code, responseBody)
  }

  ...
}
The Task above is bifurcated into two parts:
- Input and output definitions at marks [I] and [II]: Although these sections are optional, a Task's cache mechanism relies on them. Especially when the Task becomes an interplay with some predecessors or successors, handling cache correctly can lead to significant time savings.
- Task action definition at mark [III]: The specific execution unit of the Task, in this instance, we use the format of adding a no-parameter method with
@TaskActionto have it recognized and run by Gradle automatically. In terms of action logic, we accept external configuration as input to construct an HTTP POST request and send a project build success message to Slack.
2-4-5: Integrating All Components
Let's assemble all the pieces by adding the following code within our variant traversal:
val androidExtension = project.extensions
  .findByType(AppExtension::class.java)!!
androidExtension.applicationVariants.configureEach {
  // 1. Pre-verification.
  if (slackExtension.channelId.isBlank()
    || slackExtension.token.isBlank()
  ) {
    throw IllegalArgumentException("...")
  }
  if (slackExtension.enabled) {
    val appVariant = this

    // 2. Task registration.
    val taskProvider = project.tasks.register(
      "assembleAndNotify${this.name.capitalize()}",
      SlackNotificationTask::class.java
    ) {
      token = slackExtension.token
      channelId = slackExtension.channelId
      message = slackExtension.message
      notifyPayloadLog = File(
        appVariant.outputs.first().outputFile.parent,
        "slack-notification.log"
      )
    }
    taskProvider.dependsOn(this.assembleProvider)
  }
}
This part entails:
- Conducting a preliminary verification based on the Extension configuration to prevent unnecessary code execution.
- Passing the configuration mentioned above to the Task registered by the
project.tasks.register(...)method.register(...)is a lazy-configuration strategy that only executes the passed closure when the task is ensured to be included in the execution graph, in contrast withcreate(...)which executes configuration code eagerly. The Task's name isassembleAndNotify${this.name.capitalize()}, which specifies the variant it binds to. We will execute it under the Debug Variant (assembleAndNotifyDebug) to test both "packaging and notifying". - In order to incorporate the packaging flow, the notifying
TaskProviderrelies on the assembling one explicitly, you will learn more about Task orchestration in Section 4-4.
2-4-6: Configuration and Execution
Now, we will reference and configure the Plugin in slack-config.gradle.kts:
// slack-config.gradle.kts
plugins {
  id("me.2bab.buildinaction.slack")
}

val propFile = File(project.rootProject.rootDir, "local.properties")
val localProperties = Properties()
if (propFile.exists()) {
  localProperties.load(propFile.inputStream())
}
val slackToken = if (propFile.exists()) {
  localProperties["slack.token"].toString()} else ""
val slackChannelId = if (propFile.exists()) {
  localProperties["slack.channelId"].toString()} else ""

slackNotification {
  token = slackToken
  channelId = slackChannelId
  message = "... built successfully!"
}
Next, we'll incorporate it into the build script in /app/app.gradle.kts.
// app.gradle.kts
plugins {
  id("com.android.application")
  kotlin("android")
  ...
  id("slack-config")
}
Finally, we'll execute the Task ./gradlew assembleAndNotifyDebug. Under normal conditions, you will see an output similar to the one at the beginning of this section, in addition to the Bot message.
...
> Task :app:assembleAndNotifyDebug
[Pg][Slack]: Build completed, posting results...
[Pg][Slack]:{"ok":true,"channel":"...","ts":"12345...","message":{"..."}}
[Pg][Slack]: Done

BUILD SUCCESSFUL in 27s
2-4-7: Abstract Class and Member Variable
You may have noticed that SlackNotificationPlugin, SlackNotificationExtension, and SlackNotificationTask are all abstract classes. This is because:
- Typically, we do not manually instantiate the Plugins, Extensions, or Tasks, but rather leverage the Gradle framework API for instantiation. Abstract classes help to prevent improper use in this context.
- In concert with Gradle's instantiation, abstract member variables are managed by Gradle, eliminating the need for manual dependency injection and so on. More information about this can be found in Section 4-3. What's more, coupled with the use of
Provider<T>, the fields inSlackNotificationExtensionandSlackNotificationTaskcan also be abstract properties, thus solving the problem of the "write and read" order when configuring the Task. Please refer to Section 4-2 for further details.
2-4-8: In Summary
In this section, we provide a step-by-step guide to building a Gradle Plugin for sending Slack notifications after successful Android builds. It walks through the use of application Variant traversal in the Android Gradle Plugin, Extension creation for user interaction, and Task definition in Gradle, culminating in a practical application of these APIs. Again, samples in this section were not bound to the Lazy Properties (Section 4-2) mechanism and new Android Variant API v2 (Section 3-3). We'll continue to refine and improve this example in subsequent chapters.
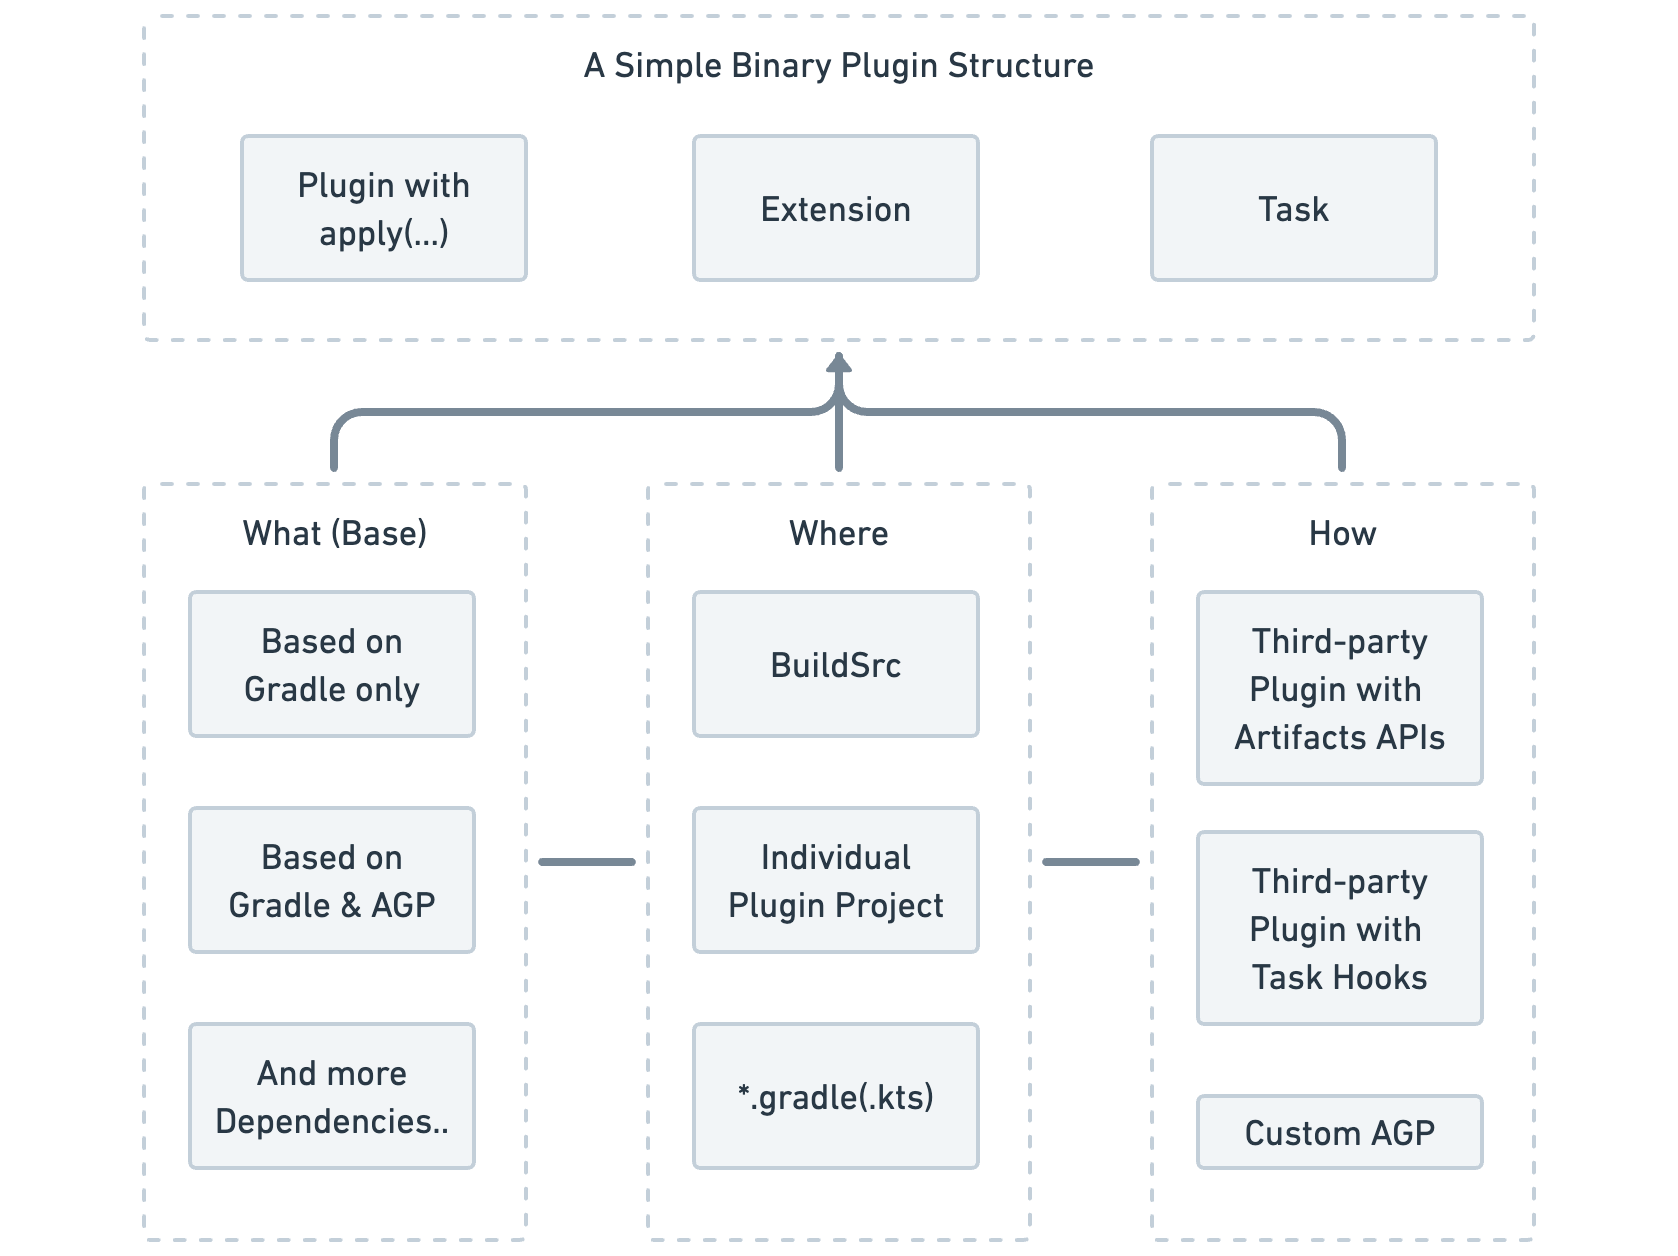
In addition, before drafting a new Gradle Plugin, we suggest covering the following three segments in your design:
- What (Base): choosing whether to implement Plugins based solely on Gradle or also on AGP. The Section 2-5 provides further details on the classification of plugins for the base layer.
- Where: deciding where to implement the Plugin logic. Refer back to Section 2-1, which encompasses build.gradle(.kts), buildSrc, individual Plugins (both script Plugins and binary Plugins).
- How: approaches to implement this custom logic.
- Customizing the AGP source directly: This approach gives developers a great deal of flexibility, but it may introduce more complexity and compatibility issues during future maintenance.
- Customizing thrid-party Plugins, considering the Android ecosystem, for instance, could be divided into:
- Customizing based on the new public Artifact/Variant API of AGP (located in the com.android.tools.build.gradle-api package): This might be the preferred approach in the future with an officially maintained interface layer, which offers more stability.
- Hooking based on the existing Tasks of AGP: This process involves finding AGP-based Tasks through the Gradle API and identifying inputs, outputs, member variables, etc. A series of hooking points, and integrating our custom Tasks based on this.
As the above topic is extensive, we can only elaborate on it from a high-level perspective. More details according to the aforementioned three segments will be expanded in further chapters. To summarize, I've combined all of the points into Figure 2.4.2.