2-2: Gradle Lifecycle Essential
In this section, we'll concentrate on the essentials, traversing the lifecycle flow and the lifecycle's context objects, thereby establishing a robust groundwork for subsequent Plugin development.
The source code used in this section is located in the gradle-lifecycle project. Some aspects, such as the code snippet for exploring the Classloader for Script Plugin, will not be elaborated in this section.
2-2-1: Lifecycle Overview
Here is an overview of the lifecycle (Figure 2.2.1).
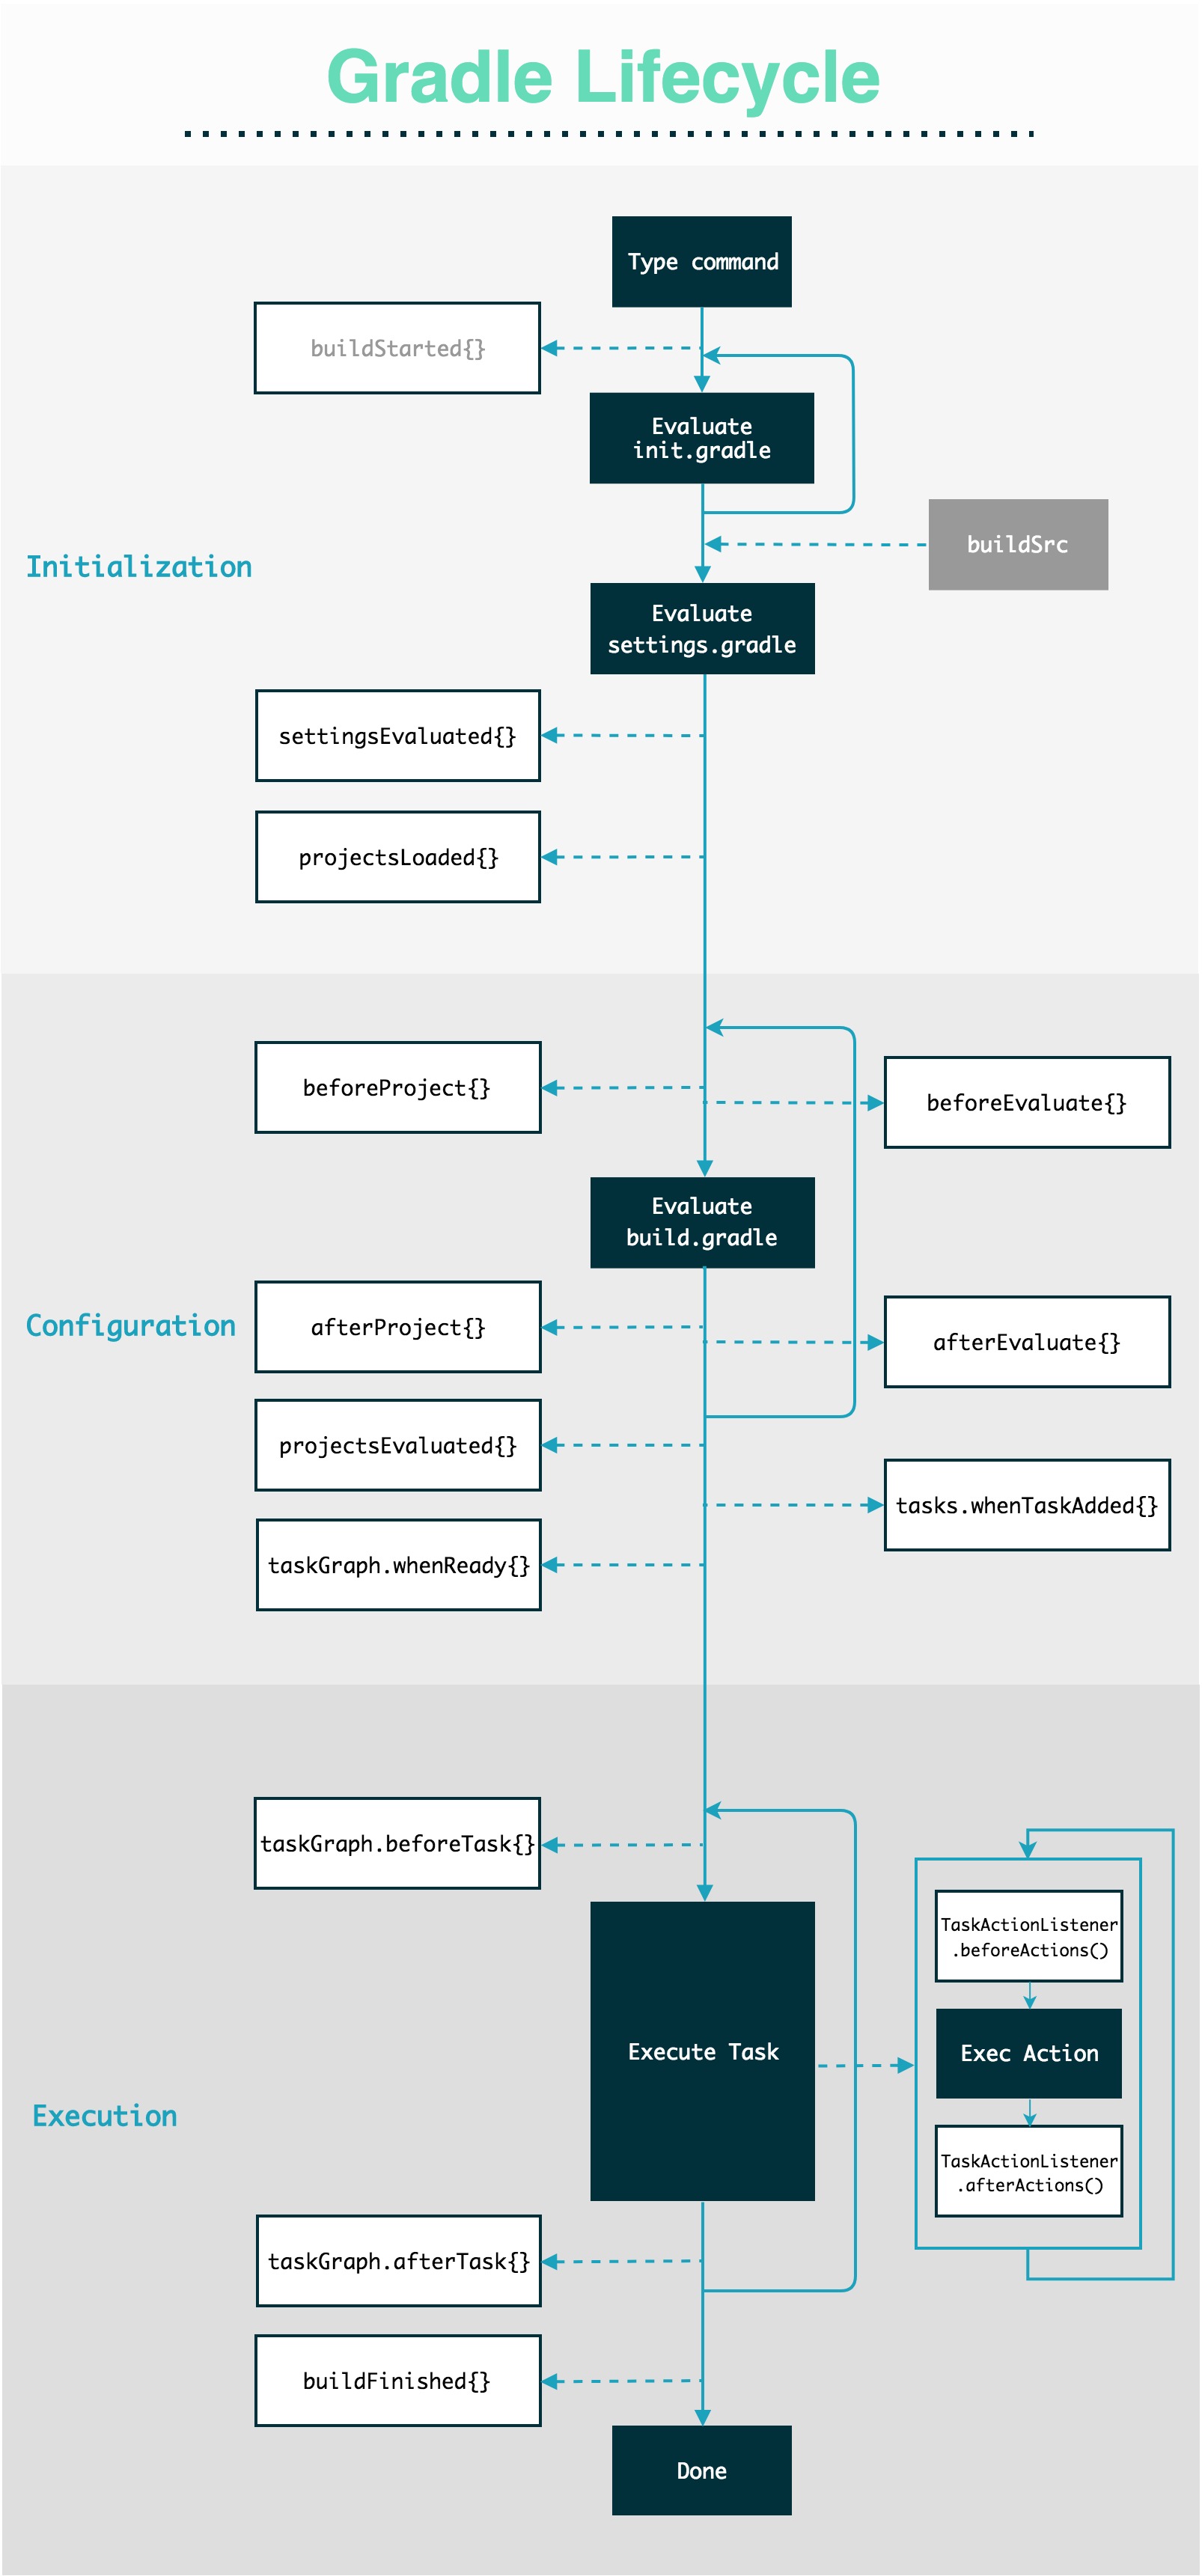
Elements to note include:
- The main flow, denoted by several black modules, embodies the main steps primarily executed during the Gradle framework's lifecycle.
- The white modules to the left of the dashed line are lifecycle hook functions affixed to the
Gradleobject. For example, throughgradle.afterProject{}, you can pass a closure that will be triggered post initialization of eachProject. - The white modules on the right side of the dashed line are lifecycle hook functions affixed to the
Projectobject. For instance, throughproject.afterEvaluate{}, you can pass a closure to trigger the hook after the project has been evaluated.
The diagram explains that Gradle's entire lifecycle can be segmented into three core phases:
- Initialization: Various initialization scripts, such as init.gradle(.kts), are executed, followed by the execution of settings.gradle(.kts) to initialize the root project's
Settingsobject. This determines the base execution environment and all participating Projects for building. - Configuration: The build.gradle(.kts) scripts of all projects are executed (initializing the
Projectobject), which includes the Plugins loaded byapply plugin:orplugins{}block, the configuration of Tasks, and finally adding all Tasks to the Graph to complete the construction of theTaskExecutionGraph. - Execution: Each Task is sequentially executed based on the input command and
TaskExecutionGraphto conclude the entire build.
We will dissect the lifecycle into these three aspects:
- Firstly, we will detail the three major stages with scripts such as init.gradle(.kts), buildSrc, and the common settings.gradle(.kts), build.gradle(.kts). We will explore their roles and why they are positioned as such in the diagram.
- Secondly, we will discuss common context objects, such as the creation and configuration of the three basic objects
Settings,Gradle,Project, and the basic functions of Task-related objects; - Lastly, we will revisit all the lifecycle Hook points, like
gradle.projectsLoaded{}project.afterEvaluate{}, spanning different listening strategies and real-life cases to reinforce comprehension.
In this section, our analysis will focus on the three main phases and key context objects. The details of the third aspect will be elaborated upon in Section 4-1. In addition, it should be noted that all discussions on the Gradle lifecycle do not include the topic of Gradle Transform Action.
Initialization
The initialization phase commences with an input command, such as ./gradlew clean. By default, Gradle kickstarts the Gradle Daemon process (or reuses an existing one). The crux of this phase is to define the lifecycle's environmental variables and to ascertain all the projects involved in the compilation, among other preparatory jobs.
init.gradle(.kts)
The init.gradle(.kts) script, executed prior to all project scripts, is utilized in the following scenarios:
- Global configuration (within a personal computer or corporate CI environment):
- Harmonizing custom private repositories.
- Standardizing environment variables, such as database access validations, repository access validations, JDK location, and more.
- Global monitoring:
- Registering Gradle event listeners.
- Registering a custom Gradle Logger.
There are multiple components comprising the init.gradle(.kts) script:
- Any *.gradle script can be designated as the current project's initialization script via
-Ior--init-script. - A script titled init.gradle(.kts) situated in the USER_HOME/.gradle/ directory can be run as a global initialization script.
- Any *.gradle(.kts) script positioned in the USER_HOME/.gradle/init.d/ directory can be run as a global initialization script.
- Any *.gradle(.kts) script located in the GRADLE_HOME/init.d/ directory can be run as a global initialization script.
The variations between these four methods include:
- The first method demands explicit script path specification in the command and may be a script exclusive to a specific project.
- The second and third methods are global configurations that can be run implicitly without any action taken during Gradle Build. The key difference between them is their execution order, the init.gradle(.kts) file is executed first, followed by the init.d directory scripts in alphabetical order.
- The fourth method is also a global configuration but is designed to be packaged into a separate distributed Gradle version. It is used when companies compile their own Gradle, leveraging this configuration to simplify the addition of features like internal repository synchronization, dependency management, and access control.
Furthermore, in instances where multiple initialization scripts exist, their execution order will follow this sequence: the four parts are executed in the order described above, and each part (and each folder) is executed in alphabetical order of the script name. Therefore, there is a loop outside of init.gradle(.kts) in the diagram.
buildSrc
We observe an external "buildSrc" block linked to the main flow. There are a few key differences between buildSrc and buildscript external build dependencies.
Firstly, buildSrc is dynamically compiled and added to the classpath by Gradle during project compilation, unlike buildscript references, which refer to pre-compiled jar packages. This provides an immediate and convenient modification advantage for buildSrc over external Plugins. The disadvantage, however, is its project coupling and lack of shareability across different projects. Additionally, buildSrc dependencies and source code can override the external classpath of buildscript.
Secondly, buildSrc is automatically included in the classpath of all scripts executed, excluding init.gradle(.kts). On the other hand, external library inclusion in the buildscript or initscript is more limited:
- The
initscript{dependencies{classpath("...")}}defined in init.gradle(.kts) is only used within itself. - The
buildscript{dependencies{classpath("...")}}defined in settings.gradle(.kts) is restricted to settings.gradle(.kts). - The
buildscript{dependencies{classpath("...")}}defined in build.gradle(.kts) is dependent on the specificProjectobject corresponding to the build.gradle(.kts). If theProjectpossesses sub-Projects, the classpath will be passed down. Otherwise, it will only be used within the script category. - While
buildscripttypically introduces external libraries as specific Gradle Plugins, buildSrc offers a wide range of applications beyond defining Plugins and scripts. It can provide support for other build scripts like build.gradle, serving as a common library for compiling scripts and defining global shared version variables, exported functions, etc.
settings.gradle(.kts)
settings.gradle(.kts) is a familiar file to most, primarily used to designate which projects will participate in the build process, including composite builds. If there's only one module, settings.gradle(.kts) is unnecessary. Considering that a regular project might not include init.gradle(.kts), settings.gradle(.kts) becomes the first accessible step for developers in the Gradle lifecycle. The following operations are typically executed in this file:
- Define the lifecycle hook of the
Gradleobject. - Modify the
StartParameter. - Deciding whether to include certain projects or define composite builds.
- Utilizing the new
pluginManagementanddependencyResolutionManagementAPIs to take over part of the root build.gradle(.kts) workload. - Enable specific Gradle incubation features, such as
enableFeaturePreview("TYPESAFE_PROJECT_ACCESSORS"). - Creating Gradle plugins targeting the
Settingsobject will subsequently lead to the application of these Plugins within settings.gradle(.kts).
Through these examples, we find that the majority of the time, the Gradle and Settings context are being manipulated within this file. Subsequent chapters will delve deeper into these three primary objects.
Configuration
During the configuration stage, Gradle sequentially executes the build.gradle(.kts) script for each project, based on the project details fetched from settings.gradle(.kts). This step involves setting up the project, parsing the necessary dependencies, and constructing the Task dependency graph.
Each project has its own build.gradle(.kts) script file. Generally, the elements executed during this stage within the build.gradle(.kts) script encompass the script's logic itself, applied Plugins (both Binary and Script Plugins). Except for the Task's Action, the rest of the script or Plugin logic is executed during this stage.
Execution
The Execution phase essentially points to the "Task Execution". Tasks, a concept that should be familiar to everyone who uses Gradle, will not be elaborated here, as Task construction, dependencies, and so forth will be addressed in a separate, future chapter:
- For basic usage of Tasks, please refer to Section 2-6.
- To learn about the
Taskinterfaces, internal action execution mechanisms, dependency order, insertion methods, concurrent worker mechanisms, and more, please refer to Section 4-4. - For insight into the caching mechanisms of Task, please see Section 4-5.
2-2-2: Contextual Objects
Let's delve deeper into the context objects inherent to the Gradle lifecycle, their genesis, the sequence of their creation, their corresponding scope, and best practices. Note that the source code tracked in this subsection corresponds to Gradle 6.
The volume of the source code is substantial, but the most important aspect here is the purpose for which we inspect - whether it is to troubleshoot an issue you are experiencing, create a pull request as a contributor, and so on. Here, we aim to comprehend how the two critical parts of the lifecycle, "sequence" and "scope", are represented. Therefore, we aim to address the following questions:
- What triggers the startup of Gradle?
- How are the key objects such as
Gradle,Settings, andProjectcreated, and what is their correlation with respective scripts? - Is there anything unusual about the scripts' internal execution order? When scripts refer to each other, are there any restrictions on how they can be used?
Gradle
In each execution cycle of Gradle project compilation, a unique Gradle object is instantiated. The Gradle term represents the public interface. GradleInternal is an internal interface inherited from Gradle, and the final implementation is provided by DefaultGradle. As we advance in our discussion, you will notice that a similar encapsulation strategy is adopted by Settings and Project.
The construction of the Gradle object occurs within DefaultGradleLauncherFactory, which uses BuildScopeServices to manage the construction process. Upon creation, the Gradle object is incorporated into the DefaultGradleLauncher. The snippet of DefaultGradleLauncher code serves as an ideal entry point for delving into other segments of source code, such as the inception of certain fundamental objects or the position of hook function execution. The doBuildStages(Stage upTo) method sequentially initiates the crucial life cycles of Gradle and assembles the Settings and Project objects.
private void doBuildStages(Stage upTo) {
  Preconditions.checkArgument(
    upTo != Stage.Finished,
    "Stage.Finished is not supported by doBuildStages."
  );
  try {
    if (stage == null && gradle.isRootBuild()) {
       buildOptionBuildOperationProgressEventsEmitter.emit(
        gradle.getStartParameter());
    }

    if (upTo == Stage.RunTasks && configurationCache.canLoad()) {
      doConfigurationCacheBuild();
    } else {
      doClassicBuildStages(upTo);
    }
  } catch (Throwable t) {
    finishBuild(upTo.getDisplayName(), t);
  }
}

private void doClassicBuildStages(Stage upTo) {
  if (stage == null) {
    configurationCache.prepareForConfiguration();
  }
  prepareSettings();
  if (upTo == Stage.LoadSettings) {
    return;
  }
  prepareProjects();
  if (upTo == Stage.Configure) {
    return;
  }
  prepareTaskExecution();
  if (upTo == Stage.TaskGraph) {
    return;
  }
  configurationCache.save();
  runWork();
}

@SuppressWarnings("deprecation")
private void doConfigurationCacheBuild() {
  buildListener.buildStarted(gradle);
  configurationCache.load();
  stage = Stage.TaskGraph;
  runWork();
}
From Gradle version 6.6 onwards, the Configuration Cache mechanism is implemented, which caches the output of the Configuration Stage. As a result, the doBuildStage(...) method has been divided into doClassicBuildStages(...) and doConfigurationCacheBuild(), which are responsible for the logic operations of initial compilation and subsequent cache application respectively.
Looking at the logic of these stages, it becomes evident that Gradle's internal compilation stage is more refined and includes the following elements:
LoadSettingsbelongs to the initialization stage;ConfigureTaskGraphbelongs to the configuration stage;RunTasksFinishedbelongs to the execution stage;
Here is the definition of Stage in Java:
private enum Stage {
  LoadSettings, Configure, TaskGraph, RunTasks() {
    @Override
    String getDisplayName() {
      return "Build";
    }
  }, Finished;

  String getDisplayName() {
    return name();
  }
}
Apart from this process, the Gradle object itself acts as a carrier for common context information. It can be accessed via an inbuilt instance named gradle in all Gradle scripts, offering numerous APIs (Figure 2.2.2).
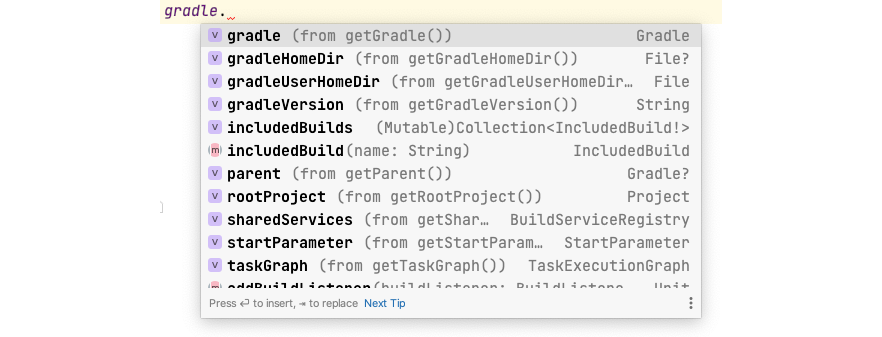
For instance:
gradle.startParametercan fetch the Gradle command input by the user, allowing for dynamic modification of some compilation conditions based on the input.gradle.includeBuild()can initiate a composite build.- Lifecycle hooks such as
gradle.settingsEvaluated(...),gradle.afterProject(...)can be accessed. For more information about these, please refer to the subsequent section.
Settings
Next, we'll take a look at the creation process of the Settings object, illuminating several interesting aspects. As noted in the first stage, we encounter the invocation of the prepareSettings(...) method. Its implementation, SettingLoader, ultimately calls settings = findSettingsAndLoadIfAppropriate(...) to create a Settings object.
Where does Gradle locate the settings.gradle(.kts) ? The specific implementation of this search process can be found in the various getLayoutFor(...) methods within BuildLayoutFactory. By default, the system searches upward from the current file path for any Gradle script file named settings (without the suffix). There are also some unique search branches, such as the search process within the folder titled master of the current path.
How does Settings contribute to settings.gradle(.kts)? We can find this evident in the invocation of the process(...) call from the ScriptEvaluatingSettingsProcessor.
public SettingsInternal process(GradleInternal gradle,
                  SettingsLocation settingsLocation,
                  ClassLoaderScope baseClassLoaderScope,
                  StartParameter startParameter) {
  ...
  TextResourceScriptSource settingsScript = new
    TextResourceScriptSource(
      textFileResourceLoader.loadFile("settings file",
        settingsLocation.getSettingsFile()));
  SettingsInternal settings = settingsFactory.createSettings(
      gradle,
      settingsLocation.getSettingsDir(),
      settingsScript,
      properties,
      startParameter,
      baseClassLoaderScope);
  gradle.getBuildListenerBroadcaster().beforeSettings(settings);
  applySettingsScript(settingsScript, settings);
  ...
  return settings;
}
It is clear that the creation of the Settings object, explicitly declared as SettingsInternal and implemented as DefaultSettings, takes place before the execution of the settings.gradle(.kts) script via the applySettingsScript(...) process. According to the official DSL Reference in the Gradle documentation, you'll find a table as follows:
| Type of script | Delegates to instance of |
|---|---|
| Build script | Project |
| Init script | Gradle |
| Settings script | Settings |
In reality, prior to the execution of any Gradle script, a corresponding delegate object is instantiated—reference the table above for specifics on delegate relationships. The fundamental part of script execution involves the configuration process for these delegate objects, with later stages such as Plugin importation, task execution, and so forth depending on the invocation of these objects.
In addition, a settings.gradle(.kts) file cannot be renamed. It can only accommodate multiple matching conditions in the suffix, i.e., .gradle or .gradle.kts, as referenced in the ScriptingLanguages class. However, renaming is permitted for the build.gradle(.kts) file (as we will see in the later part of this section).
The result of executing the settings.gradle(.kts) script will eventually lead to the apply(final Object target) method of the DefaultScriptPluginFactory, under the assumption that Gradle Groovy DSL is being utilized. Within this segment, you'll find two striking comments:
// Pass 1, extract plugin requests and plugin repositories
// and execute buildscript {}, ignoring
// (i.e. not even compiling) anything else

// Pass 2, compile everything except buildscript{},
// pluginManagement{}, and plugin requests, then
// runpluginRepositories{}, and plugin requests, then run
In essence, during the script execution process, the buildscript{} section is processed initially, followed by the remaining elements. This execution sequence applies regardless of the actual placement of the buildscript{} block within the script. This feature is often observed by developers in their routine work.
A scenario exemplifying this behavior involves specifying the version of Kotlin. Given the necessity to incorporate the Plugin in the buildscript{} section and to establish related dependencies in the project-specific dependencies{} block, it is desirable to define the Kotlin version in a single location and consistently reference it elsewhere.
// build.gradle in root project
buildscript {
  project.extra["kotlin_version"] = "1.4.31"

  repositories {...}

  dependencies {
    classpath("com.android.tools.build:gradle:4.2.0")
    classpath("org.jetbrains.kotlin:kotlin-gradle-plugin:" +
      "${extra["kotlin_version"]}")
  }
}

...

// build.gradle in application project
dependencies {
  implementation("org.jetbrains.kotlin:kotlin-stdlib-jdk7:" +
    "${rootProject.extra["kotlin_version"]}")
}
The Kotlin version often gets specified within the buildscript{} section. This value can then be assigned to the extra key-value pairs of the Project. There are a few restrictions in the buildscript{} closure:
- Code from buildSrc or other sections of the current script cannot be referenced within the
buildscript{}closure. - Regular variable declarations made inside this closure cannot be shared externally. Variables can, however, be shared through mechanisms such as
project.extra. - It does permit referencing external scripts through the
project.applywithin the closure.
The root cause is that the execution environment of the buildscript{} closure utilizes a distinct ClassLoader. When executing scripts outside the buildscript{} closure, the root node of the ClassLoader includes a reference to buildSrc. These classpaths, however, are not encompassed within the buildscript{} closure.
Root classloader is: org.gradle.internal.classloader\
  .MultiParentClassLoader@98ba92d0

Parents in MultiParentClassLoader@98ba92d0 are:
  1.VisitableURLClassLoader(ClassLoaderScopeIdentifier.Id\
    {root:/pathToTheProject/GradleLifecycle/buildSrc(export)})
  2.VisitableURLClassLoader(ClassLoaderScopeIdentifier.Id\
    {root:/pathToTheProject/GradleLifecycle/buildSrc:root-project(export)})
Project
To demystify the workings of the Gradle Project context, let's delve into the instance creation process of a Project. The initiation of the Project happens after the Settings are prepared.
// Following the execution of prepareSettings() by `DefaultGradleLauncher`,
// control is passed to this function.
private void prepareProjects() {
  if (stage == Stage.LoadSettings) {
    projectsPreparer.prepareProjects(gradle);
    stage = Stage.Configure;
  }
}
Tracing this function reveals several intermediary calls and Task wrappings, eventually leading to InstantiatingBuildLoader#load(...):
@Override
public void load(SettingsInternal settings, GradleInternal gradle) {
createProjects(gradle, settings.getRootProject());
attachDefaultProject(gradle, settings.getDefaultProject());
}
private void createProjects(GradleInternal gradle,
ProjectDescriptor rootProjectDescriptor) {
ClassLoaderScope baseProjectClassLoaderScope =
gradle.baseProjectClassLoaderScope();
ClassLoaderScope rootProjectClassLoaderScope =
baseProjectClassLoaderScope.createChild("root-project");
ProjectInternal rootProject = projectFactory.createProject(
gradle,
rootProjectDescriptor,
null,
rootProjectClassLoaderScope,
baseProjectClassLoaderScope);
gradle.setRootProject(rootProject);
createChildProjectsRecursively(...);
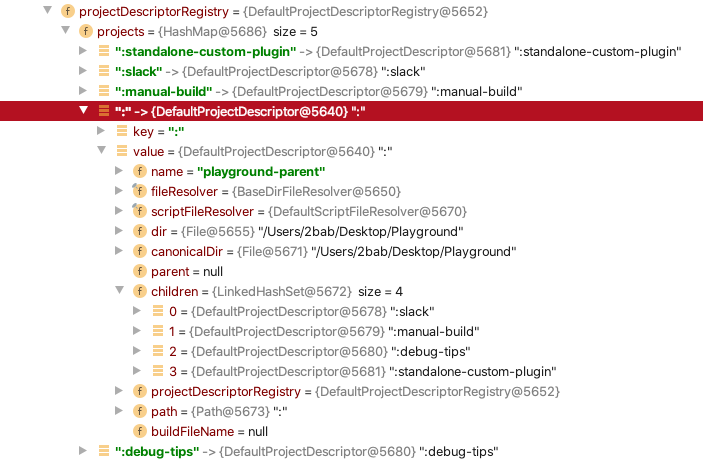
}Here, a Project object is created from the metadata of a ProjectDescriptor, while the ProjectDescriptor was assembled by analyzing references during settings.gradle(.kts) initialization internally. For instance, in the Playground project, there is one root ProjectDescriptor and several sub ProjectDescriptors (Figure 2.2.3). The root project, denoted by ":", references the other four projects as its sub-projects.
In settings.gradle(.kts), you can modify the ProjectDescription content, such as specifying the build script filename for all Projects:
rootProject.name = "playground-parent"

include(":slack", ...)

rootProject.children.forEach {
  it.buildFileName = "${it.name}.gradle.kts"
}
By altering the buildFileName, we can designate the build.gradle.kts of the Project to have other file names, thus maintaining consistency between the build script file name and the module name. It circumvents the inconvenience of relying on the IDE to add different suffixes to discern the build.gradle.kts file (Figure 2.2.4). When creating a new Project, remember to adjust the build.gradle.kts to the corresponding name prefix (e.g., slack.gradle.kts that is shown in Figure 2.2.5).


The Project implementation, akin to Gradle and Settings, comprises three basic facets: the public Project interface, the internal ProjectInternal interface, and the DefaultProject implementation.
Project hosts numerous DSLs or APIs. A thorough examination of their implementation can be facilitated by referring to the aforementioned three aspects of the code and relevant documentation:
- Direct Interactive APIs can be categorized into four subsets:
- APIs for self and related Projects' information retrieval, such as
allprojects(),subprojects(),rootProject(),buildDir,name,version, andproperties. - Helper tools such as
tasks,layout, andobjectsthat facilitate the creation of newTask,Provider<T>type,Property<T>type, or retrieval of related compilation folder paths. - DSL APIs such as
dependencies(),resources(),configure<T>(),repositories{}for configuring dependencies, Plugins, and repositories. - APIs such as
copy(),task()for task lookup, and invocation of built-in Tasks. - Utility APIs such as
logger,gradlefor simplified access. - Specific Lifecycle Hooks include
beforeEvaluate(...),afterEvaluate(...),tasks.whenTaskAdded(...), etc.
Task / Task Action / Work Action / TaskContainer / TaskExecutionGraph
In the last part, we'll explore various classes related to Gradle Task. The major implementation of Gradle Task is partitioned into Task interface, TaskInternal interface, and DefaultTask. Generally, while customizing Task, we extend from DefaultTask.
Task concept necessitates an understanding of Task Action and Work Action below it, and TaskContainer and TaskExecutionGraph above it. Here we will cover their essential functions, and Sections 4-4 and 4-5 will delve into their advanced usage.
Action
Action is an atomic interface, it represents an executable block, akin to Java's Runnable. Within the context of a Gradle Task, it serves as the fundamental execution unit, with a single Task being capable of hosting multiple Actions. Two common methods to incorporate an Action into a Task exist:
- In the implementation class of
Task, add the@TaskActionannotation to the method to be executed. - Invoking
doFirst(...)ordoLast(...)on a Task instance or within the constructor method. Regardless of whether the called method is a closure, it is internally encapsulated in anActionobject.
Worker
Worker is an API designed to implement Action logic concurrently (though there's no class named Worker, Gradle refers to it as the Worker API). Available since Gradle 4.1, and stable since 5.6 following a significant API adjustment, it has been adopted by the Android Gradle Plugin since 3.0 to accelerate builds.
For secure and reliable concurrency, theWorker API comes with usage specifications, especially the three Isolation Modes:
noIsolation(): Operates in the same Process and Classloader, but it's forbidden to modify the Project state.classLoaderIsolation(): Runs within the same Process but with a different Classloader;processIsolation(): Executes in a separate Process.
In general, noIsolation() suffices. However, the other two modes also find usage in specific scenarios, like specifying different JDK versions for specific Work in separate processes. For a deeper understanding, refer to the interfaces and implementations of WorkerExecutor, WorkQueue, and WorkAction in Section 4-4.
TaskExecutionGraph
TaskExecutionGraph is a directed acyclic graph carrier for global Task exports. Its instance is usually retrieved via gradle.taskGraph, and it utilizes taskGraph to add hook nodes in the lifecycle diagram. Observing its DefaultTaskExecutionGraph implementation class, we find it possesses three states:
EMPTY: When initialized, the directed acyclic graph is in a blank state.DIRTY: During the configuration phase, successive evaluations will advance to the dirty graph state.POPULATED: At the end of the configuration phase, after all Tasks have been determined, the installed state will be set and an external listener will be notified.
TaskContainer
TaskContainer is a simple class with a DomainObjectCollection implementation (refer to Section 4-4 for NamedDomainObjectSet details). It acts as a collection of Task. Its instance is acquired via project.tasks, encompassing all Tasks under the current Project. The lifecycle diagram demonstrates how Tasks are used to add hooks.
Through TaskContainer, we can query, add or modify the Project's Tasks via APIs like create(...), register(...), findByName(...), replace(...).
2-2-3: In Summary
This section began with a comprehensive diagram of the Gradle lifecycle, followed by an exploration of the definitions, differences, and execution sequence of multiple key processes in the script file and key classes. Subsequently, it introduced three pivotal context interfaces of Gradle: Gradle, Settings and Project. It is hoped that readers now possess a fundamental understanding of the Gradle execution process. Chapter 4 will offer more in-depth content on low-level APIs.