2-1: Gradle Project Structure
This section will explore the common architecture of a Gradle project. Before drafting any Gradle scripts or Plugins, it is critical to understand the following: What is the purpose of Gradle's default script files within the project structure? Where should one write custom Tasks and Plugins? How should projects with multiple Plugins be organized?
The source code referenced in this section is located in the project-structure project.
2-1-1: build.gradle(.kts) and settings.gradle(.kts)
Generally, each Gradle module has a build.gradle(.kts) configuration file, mainly used for Plugin references, extended configurations, and simple scripting. Depending on the DSL language used, these files can be categorized into:
- build.gradle: A configuration script based on Groovy DSL was the only choice for Gradle script configuration initially. While it is highly flexible, its dynamism is a double-edged sword—it lacks code completion and makes it challenging to find the implementation behind it.
- build.gradle.kts: A configuration script based on Kotlin DSL, introduced more recently. Characterized by Type-safe Accessor and the IDE's automatic completion support, it makes configuration more readable and maintainable. While DSL has some restrictions compared to Groovy, it is relatively easier to learn. More discussions about Gradle Kotlin DSL can be found in Section 2-3.
In this book, all scripts in the accompanying projects are based on the Gradle Kotlin DSL by default. For build.gradle(.kts) configuration files, they can also be found in the project root directory. To distinguish between them, we refer to them as "inside a specific module" and "outside a specific module":
- Inside a specific module: Its main role in the structure is to provide an entry point for compiling the current module. This entry file can be configured and modified by setting the
Project'sbuildFileorbuildFileNamein settings.gradle(.kts). Generally, developers seldom configure it actively. In the case of a few modules with clear divisions, the conventional name build.gradle(.kts) is simple and clear. - Outside of a specific module: Its main role in the structure is to work with settings.gradle(.kts) as the parent node of multiple sub-projects, used for declaring some common configurations. It's usually found in the project root directory along with settings.gradle(.kts). However, some declarations related to its dependencies can be replaced by a new API, which is unified and placed in settings.gradle(.kts). For custom logic in submodules, it's recommended to use buildSrc or Composition Build (https://docs.gradle.org/current/userguide/composite_builds.html) for better management.
settings.gradle(.kts) is a file related to the root project location: Its main role in the structure is to quickly locate the current root project location, define the module organization structure (by include(..)/includeBuild(...)), specify the path of the module project, globally define pluginManagement{}, and reference Plugins based on the Settings object, etc. Most of the time, opening a complete Gradle project entails opening a folder with settings.gradle(.kts) in the root directory.
├── android-app
│  └── app
│    └── build.gradle.kts   <-- Build script for a specific Module
│  └── library
│    └── build.gradle.kts   <-- Build script for a specific Module
│  ├── build.gradle.kts     <-- Build script for the entire Project
│  └── settings.gradle.kts    <-- Setup script for the entire project
Within the described structure, the build.gradle.kts files of the root directory and the two modules maintain a parent-child relationship. The parent module can perform general configurations for the child module through certain APIs (though this is not recommended as it can disrupt Configuration Cache mechanisms). However, depending on whether a project is a single module or a multi-module, the requirements for these script files can vary.
For single-module projects:
- The settings.gradle(.kts) script isn't necessary, but its declaration speeds up project location locating (refer to Section 2-2) and enhance some scalability (e.g., adding the script in buildSrc).
- The build.gradle(.kts) in the same root directory as settings.gradle(.kts) is not necessary, for example, it can be merged with the build.gradle(.kts) of only one module, or some of its functions can be realized by settings.gradle(.kts).
For multi-module projects:
- The settings.gradle(.kts) module is essential as it organizes module references, and the newer version of the dependency management DSL also depends on it.
- The root directory's build.gradle(.kts) isn't necessary. Projects utilizing older versions of dependency management would often create this script, while newer versions of dependency management leave this decision to the developers' discretion.
In Sections 2-2 and 4-1, we will also interpret their more general uses from the lifecycle and applicable scenarios of Gradle.
2-1-2: buildSrc
Regarding the script files mentioned above, while there are no rigid restrictions, it is advised to only write declarative configuration logic and avoid complex Task implementation. If there's a need to extract repeated logic processing, we can, for instance:
- Extract the configuration part only as a Convention Plugin.
- Extract the additional Tasks with other processes as a Domain Specifc Plugin (the term is used in this book only).
Where should those plugins be placed? The Gradle platform provides an effortless, configuration-free solution: the buildSrc module. buildSrc serves as the default local build script module for Gradle projects and, much like any classpath("com.xyz") we define in buildscript{}, will participate in the project's compilation process.
The structure of the buildSrc module doesn't differ from that of a standard JVM project. For instance, a version utilizing the Kotlin Plugin would look like this:
├── android-app
│   └── app
│     └── build.gradle.kts
│   └── library
│     └── build.gradle.kts
│   └── buildSrc  [I]
│     └── src  [II]
│       └── main
│         └── kotlin
│           ├── DummyConstants.kt
│           ├── dummy-script-plugin.gradle.kts
│           └── DummyBinaryPlugin.kt
│     ├── build.gradle.kts
│     └── settings.gradle.kts  [III]
│   ├── build.gradle.kts
│ └── settings.gradle.kts- [I] It is recognized and loaded by Gradle via the directory name buildSrc.
- [II] It can directly declare src packages when buildSrc serves as a single module.
- [III] settings.gradle.kts is optional and is used to organize multiple modules within buildSrc.
The name of the buildSrc module cannot be changed and will be automatically loaded into the classpath at the compilation stage. If we specify Kotlin as the main language used in buildSrc, it can contain both Kotlin files (classes) and *.gradle.kts scripts (with the help of the kotlin-dsl Plugin). The classes or scripts exported for external scripts are typically presented in one of three ways:
- Constant classes, such as DummyConstants.kt.
- Script Plugins, such as dummy-script-plugin.gradle.kts.
- Binary Plugins, such as DummyBinaryPlugin.kt.
The basis of classification and examples of the aforementioned classes will be discussed in subsequent chapters. For further details about the loading timing of buildSrc and the differences between buildscript{}, please refer to Section 2-2.
2-1-3: Composite Build
We've learned that buildSrc will be automatically recognized and incorporated by Gradle. However, if multiple projects (corresponding to multiple settings.gradle(.kts)) need to use the same Plugin, above solution cannot be applied. It's natural to think that an independent buildSrc module could solve the problem.
In the following diagram, we define a build-logic module, which mirrors buildSrc closely, acting as a typical Gradle project based on Kotlin:
├── android-app
│   └── app
│     └── build.gradle.kts  [III]
│   └── library
│     └── build.gradle.kts
│   ├── build.gradle.kts
│   └── settings.gradle.kts  [II]
├── build-logic  [I]
│   └── src
│     └── main
│      └── kotlin
│         ├── DummyConstants2.kt
│         ├── dummy-script-plugin2.gradle.kts
│         └── DummyBinaryPlugin2.kt
│   ├── build.gradle.kts
│   └── settings.gradle.kts
[I] Note that the above example places the module outside of android-app for simplified management and sharing with other projects. However, there is no specific requirement regarding its relative location.
How can we incorporate it into the android-app? Gradle provides a mechanism known as Composite Build, which allows the inclusion of an independent Gradle project into the current project's build process. The implementation of Composite Build relies on the includeBuild(...) API:
// Add the following configuration inside [II] settings.gradle.kts:
includeBuild("./build-logic")
The includeBuild(...) function includes the external project into the current build environment, and the modern IDEs will also display the external project in the project list. However, the two projects remain independent at present, and the classes in build-logic cannot be directly referenced and used by the script at [III]. If we try to reference DummyConstants now, we will get the following error prompt:
e: Unresolved reference: me.xx2bab.extendagp.buildlogic.DummyConstantsThe solution isn't complicated. We simply need to load a Plugin from within it to import the entire package into the current script. For instance, add the following script at [III]:
plugins {
  id("com.android.application")
  kotlin("android")
  id("dummy-script-plugin2")
  // or id("dummy-binary-plugin2")
}
In fact, as long as a module's jar contains the relevant declarations of gradle-plugins, it will trigger the Service Provider Interface (SPI) inclusion, causing Gradle to automatically include it in the list of referenceable Plugins. As a result, we can find the corresponding package to be included in the current script context through the reference of the Plugin, which is equivalent to the reference of a remote Plugin. Therefore, even if an includeBuild(...) module only has constant definitions, we can also use the trick of defining an empty Plugin to make it accessible by our script.

Up to this point, we can perceive the key difference between buildSrc and Composite Build: "automatic addition of the build-time classpath during the build". In order to distinguish the usage scenarios of the two, I summarized a few more differences:
| Supported Features | BuildSrc | Composite Build |
|---|---|---|
| Automatically add the build-time classpath when building. | Yes | No, includeBuild(...) must be executed first to include the module, and then the corresponding Plugin should be introduced in the required module (you may also need to explicitly specify the Maven coordinates for replacement). |
| Automatically run tests when building. | Yes | No |
| The module can use any name. | No, the convention and the only valid name is buildSrc. | Yes |
| Is it an independent project? | No, it is bound to the existing project, but can be published to the remote repository through configuration. | Yes, and it can be published to a remote repository or shared through Composite Build. |
| Can be extended to multiple modules. | Yes | Yes |
| Can this build pattern be used in a nested way? | No, buildSrc itself cannot be nested, nor can it reference external modules through Composite Build. | Yes, but there was a Sync failure in the old version (before BumbleBee) of Android Studio, although the compilation worked through CLI. |
I believe that both buildSrc and Composite Builds embody a form of "convention over configuration": one simplifies the steps of introducing custom Plugins into the current compilation environment, enabling developers to fulfill some common requirements more quickly; the other one provides more comprehensive capabilities, but also increases the configuration burden. Developers are able to make decisions based on the actual circumstances of the project and the build's complexity.
All of the preceding discussions about Composite Builds pertained to the code environment at compile time, and we are dealing with matters related to extending the build script. In reality, the includeBuild(...) method can also bring in other ordinary runtime code libraries, much like the include(...) method, for instance:
├── android-app
│  └── app
│    └── build.gradle.kts
│  └── library
│    └── build.gradle.kts
│  ├── build.gradle.kts
│  └── settings.gradle.kts
├── composite-library  [I]
│  └── src
│    └── main
│      └── kotlin
│        └── LibraryApi.kt
│  ├── build.gradle.kts  [II]
│  └── settings.gradle.kts
We introduce the [I] composite-library to the current project's build environment in the same way:
includeBuild("./composite-library")But how do we link the app and the composite-library without a Gradle Plugin? In fact, just like referencing an external dependency, we need to define a coordinate for this external module and add it to the app's implementation configuration:
// Version name is not necessary.
implementation("me.2bab.extendagp:composite-library")
The above coordinates consist of two parts:
- [Group: "me.2bab.extendagp"]: Corresponding to
project.group = "me.2bab.extendagp"defined in build.gradle.kts of composite-library at [II]. - [Artifact/Classifier: "composite-library"]: Corresponding to
project.nameofcomposite-library, but sinceproject.nameis modified byval, the default value here is the folder name (at [I]).
Those familiar with Maven repository publishing should know that the above definitions are also the default parameters used when publishing to a remote repository, referred to as GAV (Group, Artifact, and Version) coordinates. This quote, combined with includeBuild(...), completes the app's dependency on the composite-library module, allowing us to use classes from external modules in MainActivity:
class MainActivity : Activity() {
  override fun onCreate(savedInstanceState: Bundle?) {
    super.onCreate(savedInstanceState)
    setContentView(R.layout.activity_main)
    LibraryApi().run()
  }
}
It also introduces a key mechanism of Composite Builds: Dependency Substitution. When a Composite Build is introduced, it combines the three basic metadata of its module into coordinates, replacing the corresponding dependencies in the current build environment. This mechanism also supports the replacement of compile-time Plugins, i.e., modules declared with buildscript {classpath ("...")}. In addition to the implicit substitution demonstrated earlier, you can also declare explicit substitution in special scenarios, such as when the three basic metadata of the module and the actual coordinates are inconsistent. We can call the dependencySubstitution(...) API to proactively declare substitution rules.
includeBuild("../plugins/slack") {
  dependencySubstitution {
    substitute(module("me.2bab.extendagp:slack"))
      .using(project(":"))
  }
}
This code snippet denotes that the module coordinates me.2bab.extendagp:slack will be replaced by the local project ":", which is the root project of plugins/slack.
This mechanism is well suited for the following scenarios:
- When dealing with issues in open-source third-party dependencies, you can directly use a single line of code
includeBuild(...)to reference the source code cloned locally, thereby replacing the remote version for modification and debugging. - To speed up build times and reduce coupling, large or medium-sized Android Apps usually adopt modular development. The Application module may primarily depend on aar or jar from the private Maven repository while packaging. When developing locally, we may depend on the source code of certain modules as per requirements. In these situations, Composite Build can assist developers in switching between two integration solutions.
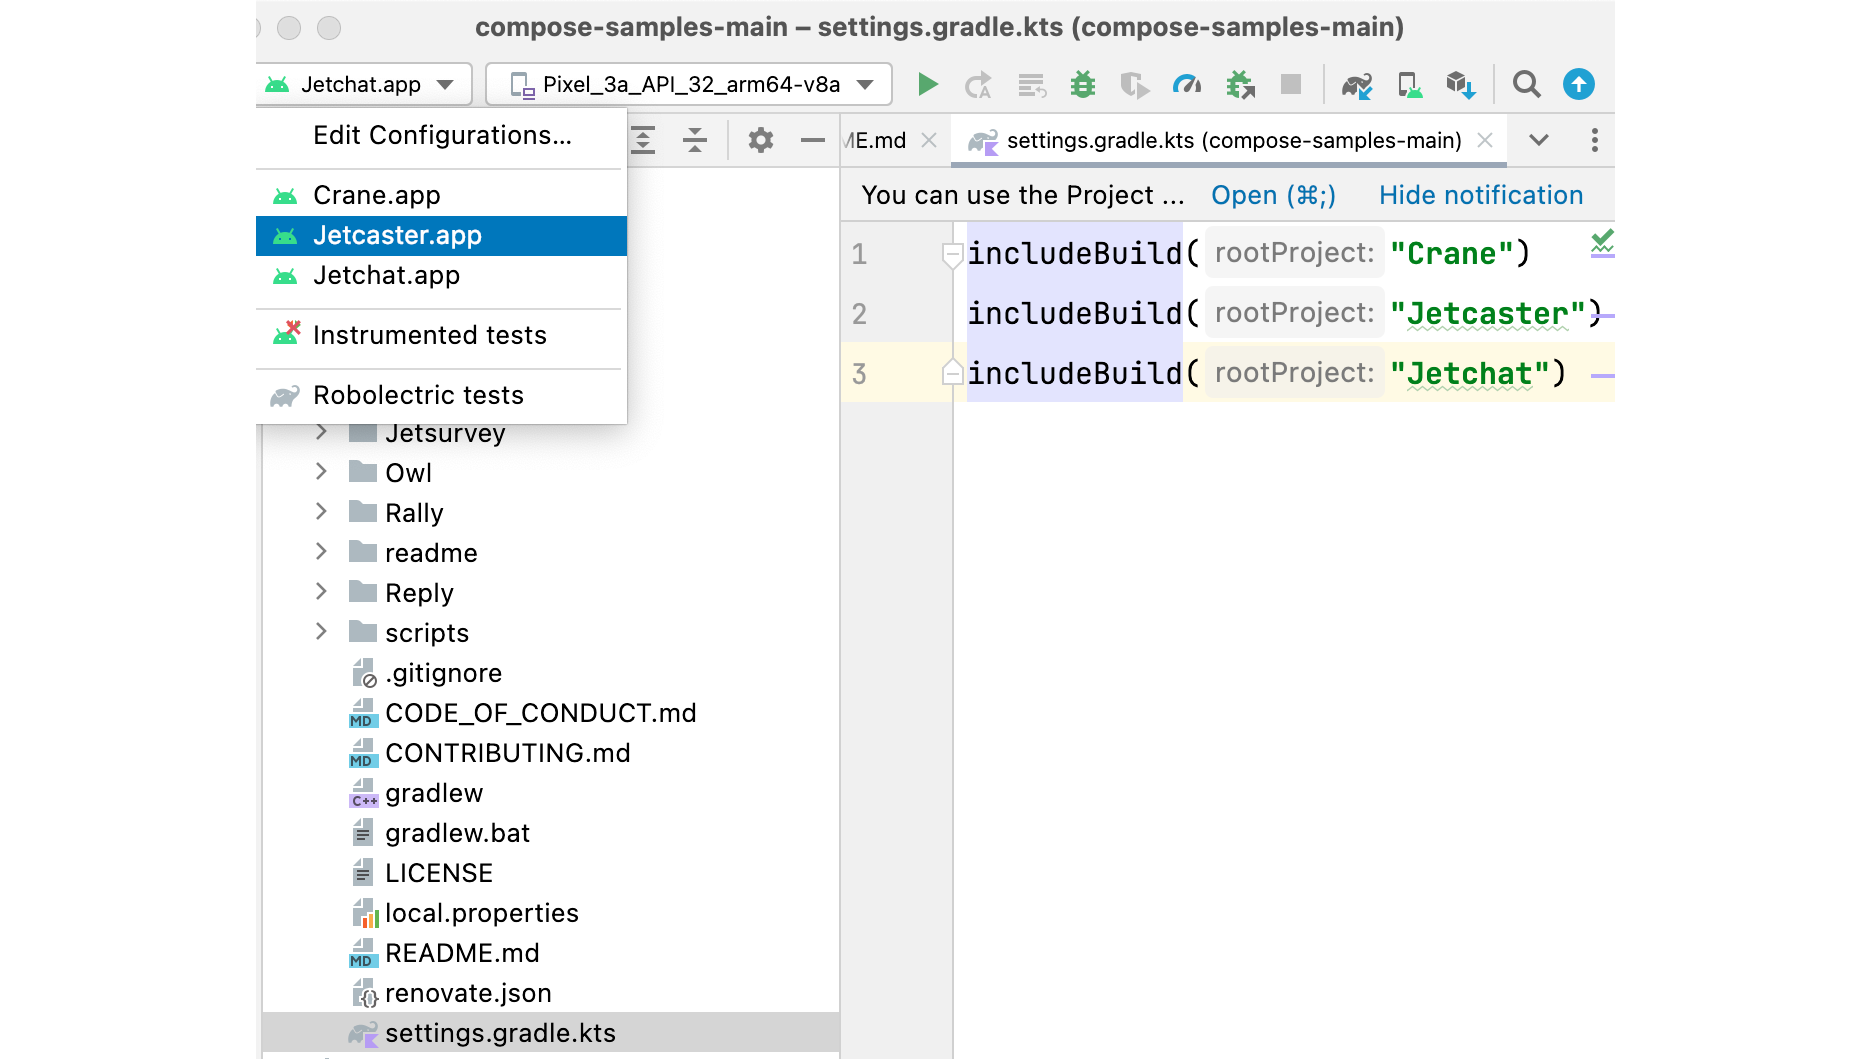
- Composite Build can be used to include a sample project with dozens of different apps, like the Android compose-samples (https://github.com/android/compose-samples). By adding a settings.gradle.kts in the root directory and using
includeBuild(...)to add all the sample modules to the current project environment, it makes it convenient for IDE recognition and running and debugging all the samples (Figure 2.1.2).
Regarding the second scenario, we recommend optimizing it with the following structure:
├── android-app
│   └── app
│     └── build.gradle.kts
│   └── settings.gradle.kts
├── lib-module-1
│   └── lib1
│     └── build.gradle.kts
│   └── settings.gradle.kts
├── lib-module-2
│   └── lib2
│     └── build.gradle.kts
│   └── settings.gradle.kts
├── build.gradle.kts  [I]
└── settings.gradle.kts  [II]
Besides the three independent projects, we also define an additional build.gradle.kts and a settings.gradle.kts (at [I] and [II]). They are just local build files, which may vary for each developer. For instance, if I'm solely maintaining lib-module-1, the code would be:
// build.gradle.kts
defaultTasks("assembleDebug")

tasks.register("assembleDebug") {
  dependsOn(gradle.includedBuild("android-app")
    .task(":app:assembleDebug"))
}

// settings.gradle.kts
rootProject.name = "my-composite"

includeBuild("android-app")
includeBuild("lib-module-1")
// includeBuild("lib-module-2")
Composite Builds defined at the outer layer are only used in local development and do not affect any existing project code. It simplifies the configuration of local development (eliminating the if...else... judgement for environment set-up and module composition) and is more flexible – after all, the modules maintained by each developer may be different, and they don't all need to be replaced at once.
How should one choose between the includeBuild(...) of Composite Build and the typical include(...)?
- The modules incorporated by
include(...)will receive the context of the current build environment automatically, such as components defined in buildSrc; when included by other modules, local dependencies will be explicitly referenced withimplementation(project("lib")). - Modules included by
includeBuild(...)are considered independent in terms of build dependencies. Nevertheless, we can share certain build components with the build-logic module, as mentioned; when included by other modules, it is based on the Dependency Substitution mechanism.
Lastly,Composite Build is continually evolving, and its usage restrictions are constantly updated. Therefore, developers are advised to stay tuned for the latest documents. The Gradle team suggests that the functionalities of buildSrc may be represented via Composite Build in the future, opening up more possibilities for buildSrc.
2-1-4: Managing Multiple Plugin Modules in One Project
In Section 1-1, we've introduced the example project known as Playground. This project comprises several distinct mini-projects, such as manually constructing an APK as covered in Section 1-4. However, one pivotal sample, namely slack. The primary aim of the slack project is to illustrate how one might utilize Gradle to facilitate the evolution of a Plugin from its basic function to its most recent API usage.
During debugging or source code perusal, the ability to switch between different Plugin versions and developmental stages by altering a single line of configuration proves extremely beneficial. I've constructed the following structure for the Slack project that is shown in Figure 2.1.3.

This structure unifies the development, configuration, testing, and verification processes across numerous Plugin modules, bearing the ensuing traits:
- Each Plugin is relatively independent and can be developed as a standalone project. This applies to the plugins folder and the multiple Plugins inside, such as slack, slack-lazy.
- When debugging any Plugin (e.g., slack) within the test app, modifications can be swiftly processed and their impacts promptly discerned.
- Any Plugin and its corresponding configuration (plugin-config) referenced by the test app can be effortlessly integrated and detached.
- The test app, Plugin module, and Plugin configuration module can share certain build parameters, such as dependencies and versions.
To address points 1 and 2, we split the Plugin modules and import them via Composite Build.
For point 3, should our goal be to enable low-cost Plugin configuration, it becomes essential to segregate each Plugin configuration into a discrete Script Plugin. Since we employ Gradle Kotlin DSL, we should house these Script Plugins either within buildSrc or by utilizing another Composite Build module, such as by creating a module dubbed plugin-config. Reflecting on our prior discussion in this section, we elected to implement the Plugin configuration module and multiple Plugin modules using a nested Composite Build approach.
Lastly, to address point 4, we logically extracted the build-env and orchestrated its configuration across multiple Plugins and test application modules in a consistent manner.
In Section 2-4, we will inspect the initial version of the slack notification Plugin and progressively enhance it throughout Chapter 4.